In this tutorial, we will learn how to implement drag and drop using plain React. The example app that we are going to build is very simple, almost trivial. My objective is to document the steps in plain React. Those steps are going to mimic the steps that we need to setup drag and drop using vanilla JavaScript.
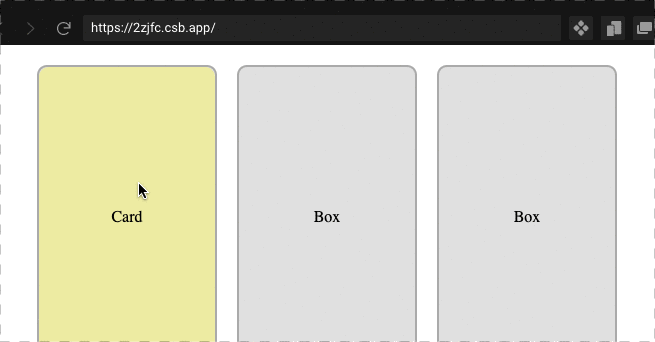
Overview of the drag and drop app
There are 3 boxes and a card. We can drag the card from one box and leave it in another box. When we drop, the card moves from one box to another. There are some visual effects. When we start dragging, the card colour changes from golden yellow into pink. When we drag the card over a box, the box changes colour from grey to blue.
There is a CodeSandbox for this tutorial.
The steps to implement drag and drop are:
- Create the Box and Card components.
- Make the Card component draggable.
- Handle onDragStart and onDragEnd events on Card component.
- Handle onDragOver and onDragLeave events on Box component.
- Use the onDragOver event handler to indicate that Box component is a drop target.
- Handle the onDrop event on Box component to move the card.
A) Create the Box and Card components
In the Card component, we display a simple div:
function Card() {
  return (
    <div className="card">Card</div>
  );
}
The Box component has a card prop that is a boolean. If the card prop is set to true, we display the Card component within the Box component.
function Box({ card, moveCard }) {
  return (
    <div className="box">
      {card ? <Card /> : "Box"}
    </div>
  );
}
App component has three boxes. By default, the card is stored in the first box. When we move the card from box to box, the index of the box that stores the card changes. We store this index in a state. The moveCard function moves the card from one box to another by setting the index of the box that stores the card.
export default function App() {
  const [index, setIndex] = useState(1);

  function moveCard(i) {
    setIndex(i);
  }

  return (
    <div className="app">
      <Box card={index === 1} moveCard={moveCard.bind(null, 1)}></Box>
      <Box card={index === 2} moveCard={moveCard.bind(null, 2)}></Box>
      <Box card={index === 3} moveCard={moveCard.bind(null, 3)}></Box>
    </div>
  );
}
B) Handle drag events on the Card component
Add a draggable prop to the Card component like so:
<div
  className="card"
  draggable>
    Card
</div>
Handle the onDragStart and onDragEnd events.
function Card() {
  const [isDragging, setIsDragging] = useState(false);

  function handleDragStart(e) {
    setIsDragging(true);
    const data = JSON.stringify({ type: "card" });
    e.dataTransfer.setData("text/plain", data);
  }

  function handleDragEnd(e) {
    setIsDragging(false);
    e.dataTransfer.clearData();
  }

  return (
    <div
      className="card"
      style={{
        backgroundColor: isDragging ? "#fbb" : "palegoldenrod"
      }}
      draggable
      onDragStart={handleDragStart}
      onDragEnd={handleDragEnd}
    >
      Card
    </div>
  );
}
There is a state variable with name “isDragging”. This indicates whether the drag is in progress. Set this state as true in the onDragStart handler. Set it back to false in the onDragEnd handler. When we are dragging, we are changing the background colour of the card.
backgroundColor: isDragging ? "#fbb" : "palegoldenrod"We use the drag event to store any information about the drag object. To be more specific, we store the information using the dataTransfer object. In our sample app, we store a JSON object that has the type of the object (type=”card”) that we want to drag. The below code does that in the drag start handler.
const data = JSON.stringify({ type: "card" });
e.dataTransfer.setData("text/plain", data);
In the onDragEnd handler, we clear the data stored in the drag event.
e.dataTransfer.clearData();C) Handle the drag events on the Box component
Handle the onDragOver event on the Box component.
onDragOver={handleDragOver}This event handler is important as we tell the browser to make the element a drop target. We use the “event.preventDefault()” method to indicate that. By default, the browser ignores any drag event on an element. By preventing the default behaviour, when the user drops the dragged element, the browser fires the onDrop event. The code is simple, but this part of the API is a bit difficult to understand.
  function handleDragOver(e) {
    if (e.dataTransfer.types[0] === "text/plain") {
      setIsOver(true);
      e.preventDefault();
    }
  }
We also have some checks in-place. If the dataTransfer object in the drag event has a type of “text/plain”, then we proceed with the event handler. The event handler changes the isOver state as true.
const [isOver, setIsOver] = useState(false);When the dragged element (card) is over the drop target (box), the background colour of the box changes from grey to blue.
style={{ backgroundColor: isOver ? "#bbf" : "rgba(0,0,0,.12)" }}Handle the onDragLeave event on the Box component.
onDragLeave={handleDragLeave}This event changes the isOver state to false again. It indicates that the card is not over the box.
  function handleDragLeave() {
    setIsOver(false);
  }
D) Handle the drop event on the Box component
Finally, we get to handle the drop event on the Box component. The browser fires this event only if we call “event.preventDefault” in the onDragOver event handler.
onDrop={handleDrop}In this event, we get the data that was set in the onDragStart event handler. And if that data has the type of the element (type=card), we proceed with the move action.
 function handleDrop(e) {
    const dataJSON = e.dataTransfer.getData("text/plain");
    let data;
    try {
      data = JSON.parse(dataJSON);
    } catch {}
    if (data && data.type === "card") {
      moveCard();
    }
  }
Since, we are storing JSON data as string, we parse it back to a JavaScript object. JSON.parse method throws an exception if the data is not valid JSON. So, we catch any exception in the parse method.
The moveCard function moves the card from one box to another by setting the box that stores the card. If you recollect, we defined the moveCard function in the App component.
The entire code is available in the CodeSandbox. If this is all too much for you to handle, the react-dnd package offers a convenient API for implementing drag and drop. There is a tutorial that explains how react-dnd works.
How to write test case for this component using react-testing-library and jest?