

This tutorial will show you how to convert a static website that uses HTML, CSS and JavaScript (JS) to a dynamic one using MongoDB, Express, Static HTML, CSS, JS, and Node.js.
Our tech stack will be similar to the popular MEAN/MERN stack (MongoDB, Express, Angular or React, and NodeJS). But instead of using Angular or React, we will use a templating engine called EJS (Embedded JavaScript.)
Other popular templating engines include Handlebars, Pug, and Nunjucks.
Afterwards, we will deploy our Node.js web app to DigitalOcean and cover domain names, SSL, reverse proxies, and process managers.
Learning a templating language can be easier than a JS framework. You can just write HTML, and it lets you insert the same piece of code in multiple locations (called partials) or pass server-side variables to be displayed on the front-end (such as a username).
Table of Contents
Developing Your First Node.js Web App
Installing Node.js
First, make sure you’ve installed Node.js on your local machine or VPS hosting provider. If you haven’t installed it, go to the Node.js website to do so.
With Node.js, you can write server-side code using a special form of JavaScript so you can use an already familiar language.
The Node.js installer comes bundled with the package manager NPM. NPM is a repository for Node Modules, reusable pieces of code that can extend the functionality of your server. It’s similar to a plugin repository, and Node Modules can be thought of as code snippets or libraries (depending on how large they are).
Windows Users: Need to add Node and NPM to their PATH so they can call them easily on the command line. For more in-depth instructions, see my guide here.
Testing the Install
To test that the installation has worked correctly, open a terminal window, and type node -v and npm -v. If the resulting message starts with a v and is followed by some numbers (indicating a version), then the installation has been successful. Now you’re ready to create your first server.
Creating Your First Server
Once you have created a static website, the first step in creating a Node.js app is to create an Express web server.
First, move all your website’s static files (HTML, CSS, JS, images, etc.) into a folder called public and create a file called server.js in the root directory of your website folder. In the server.js file type:
// Load Node modules
var express = require('express');
// Initialise Express
var app = express();
// Render static files
app.use(express.static('public'));
// Port website will run on
app.listen(8080);
Then in the terminal, type: npm init. Press enter to accept the default parameters for all the following options, but make sure the entry point is server.js.
Finally, type: npm start and then go to the IP Address of your VPS host, or localhost:8080/index.html (or the name of one of your webpages) in the browser. The Express server you just created should now be serving your website’s static files.
Next Steps
Moving forward, we will discuss how to convert your static files to dynamic ones using the EJS templating engine. Then we'll look at how to copy repeated code using partials and inject server-side variables to the front-end.
Templating Basics
Installing EJS
The first step to use EJS is to install it. A simple npm install ejs --save will do the trick. The --save parameter saves the module to the package.json file.
This makes it so anyone who clones the git repo (or otherwise downloads the site's files) can install all the required Node modules for the project (called dependencies) using the npm install command instead. Then they don't have to type npm install (module name) for however many modules they need.
Converting Static Pages to EJS Files
Next, you need to convert your static HTML files into dynamic EJS ones and set up your folder structure in the way EJS expects.
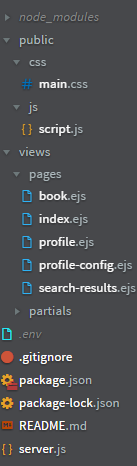
In the root directory of your website, create a folder called views. Inside that folder create two sub-folders called pages and partials. Move all your HTML files into the pages sub-folder and rename the .html file extensions to .ejs.
Your folder structure should look similar to the picture below.
Reusing Code - Creating Your First EJS Partial
When creating static sites, there's often code that you repeat on every page such as the head (where the meta tags are located), header, and footer sections.
It's inconvenient to change them on every page (especially on larger sites) if alterations are needed. But if you use EJS partials then you won't have to. Editing one template (partial) file will update the code on every page that the file is included in.
We'll take a typical part of a website to be templated, the header, as an example. Create a new file called header.ejs in the partials folder. Copy and paste all the code between the <header></header> tags on one of your EJS pages into it.
Finally, on all pages with a header delete the code between the <header></header> tags (the same code you copied to the header.ejs partial file) and replace it with <% include('../partials/header') %>. Now, you've created your first EJS partial. Repeat the process for any other repetitive pieces of code such as the head and footer sections.
Small Tip: If you find it hard to differentiate between your pages and partials since they have the same .ejs file extension, it can be helpful to put an underscore _ in front of the names of partials (so _ header.ejs). This is a naming convention that some developers use that can be helpful.
Rendering EJS Pages
Now we get to the exciting part: making the server render the EJS pages and partials so you can see them on the front-end.
server.js Example
// Load Node modules
var express = require('express');
const ejs = require('ejs');
// Initialise Express
var app = express();
// Render static files
app.use(express.static('public'));
// Set the view engine to ejs
app.set('view engine', 'ejs');
// Port website will run on
app.listen(8080);

// *** GET Routes - display pages ***
// Root Route
app.get('/', function (req, res) {
    res.render('pages/index');
});
First, we need to add the EJS Node module to our server. So, in the server.js file (see example above), add const ejs = require('ejs');.
Second, we need to tell our Express server to use EJS so add app.set('view engine', 'ejs');.
Now, we need to configure routes. Routes tell the server what to do when a user goes to a certain URL in your website such as http://testapp.com/login.
There are two types of routes, GET and POST. GET routes display pages and POST routes upload data from the front-end to the server (usually via a form) typically before a page is rendered and the uploaded data is somehow used.
Since we only want to display our EJS pages, we will just use GET routes. Add them after the app.listen(8080) line in server.js. For the index page, the route will be:
// *** GET Routes - display pages ***
// Root Route
app.get('/', function (req, res) {
    res.render('pages/index');
});
The '/' specifies the URL of the website the code will activate on, the req stands for request and res for response. So, the response returned when going to http://testapp.com is rendering (displaying to the browser) the pages/index.ejs page. Add similar routes for your other EJS pages.
Passing Server-Side Data to the Frontend
The main attraction of templating, apart from reusing code, is that you can pass server-side variables to the front-end. Either a single variable like the current user's username, or an array, like the details of every registered user.
However, the real strength of passing server-side variables becomes apparent when using APIs or databases.
For a basic example, the below code will display "Louise" in the h2 tag of the index page:
server.js
// Route Route
app.get('/', function (req, res) {
    var name = "Louise";
    // Render index page
    res.render('pages/index', {
        // EJS variable and server-side variable
        name: name
    });
});
The first name is the name of the EJS variable (the name for displaying it on the front-end), and the second is the variable that contains the data you want to send. (They don't have to be identical.)
index.ejs
<h2>My name is <%= name %></h2>
For a simple array, you can use this example instead, which will create a p tag for every name in the listnames variable:
server.js
// Route Route
app.get('/', function (req, res) {
    var listnames = ["Louise", "Sadie", "Erik", "Raph", "Gina"];
    // Render index page
    res.render('pages/index', {
        // EJS variable and server-side variable
        listnames: listnames
    });
});
index.ejs
<% listnames.forEach(function(name) { %>
        <p><%= name %></p>
        <% }); %>
Congratulations. You’ve finished developing your first Node.js web app. In the next part, we will see how we can make it live (deploy it) on the web so you can show it off.
Deploying Your First Node.js Web App
There are many hosting platforms you can use to deploy your Node.js web apps such as Section, Heroku, Vultr, Linode, Google Cloud Platform and Amazon Web Services.
In this walk-through, we will be using DigitalOcean to deploy our Node.js app.
Setting up DigitalOcean
First, create an account on the DigitalOcean platform. There are discount codes available to add free credit to your account such as the code available in the Github Student Developer Pack. Be aware that you can only redeem one code per account.
Second, you need to create a droplet. A droplet is a VPS (Virtual Private Server.) It’s similar to a Linux VM which is hosted on a server farm somewhere.
Once you’ve logged into your account, go to droplets under the Manage heading and click create and then droplets.
You can leave most of the settings as the default but change the plan to the basic $5 a month which contains enough resources for your app. You can scale this up later if needed.
Also, choose the datacenter closest to the target audience of your app and change the authentication to password. While password authentication is less secure (SSH Keys is recommended), it’s much easier to set up. So, for demonstration purposes, we’ll use this method.
All that’s left now is to pick a name (hostname) and click Create Droplet.
Connecting to your Droplet
Shortly afterward, you’ll receive an email containing the username and password of your droplet which you’ll use to login.
Back on the DigitalOcean website, under droplets, click the name of your newly created droplet, and then click on Console. This will open a new tab that will let you control your droplet.
Alternatively, you can use any SSH client with the IP address and user credentials contained in the email.
On your first login, since you used password authentication, it will prompt you to set a new password. A great way to generate secure passwords and store them is a password manager like LastPass.
Deploying Your Node.js Web App
First, you’ll need to copy the code for your web app to your droplet. If you’re using source control such as Git, then it’s as simple as installing git using apt-get install git -y and then using the git clone command git clone (link to your repository), adding the link to your repository at the end.
Second, you’ll need to install Node. Type:
curl -sL https://deb.nodesource.com/setup_14.x | sudo -E bash -
sudo apt-get install -y nodejs
Third, you'll need to navigate to the folder containing your web app. Type ls and then enter to view all the folders in your current working directory (location). This will look like the image below:
![]()
Type cd and then the name of the folder that appears. Type ls again and you should see the files in your web app's root directory.
Next, you’ll need to install the node modules (dependencies) for your web app. If you installed all your modules with -save at the end, which saves them to the package.json file, then just type npm install and press enter.
If not, when you run npm start an error will appear with module not found. Type npm install (module name) and press enter and then try running npm start again. Repeat the process until the error disappears.
If you need to install MongoDB (if you’ve created a MongoDB database), then follow these instructions.
Finally, type npm start to start your web app. Now that your web app is running, in a new browser tab, type the IP Address of your droplet (found in the email that DigitalOcean sent when you created the droplet) followed by a colon and the port your app runs on. For example, 167.172.54.51:8080.
If you’re using an Express web server (which if you followed my getting started with Node.js guide, you did), you’ll find the port number located in the app.listen() line inside the server.js file. For example, app.listen(8080) which is a common port used.
Congratulations, your first Node.js web app should be displayed in your web browser which is running on your DigitalOcean droplet.
Configuring Your Domain Name
You typed in an IP Address and port number to view your web app but, wouldn't you prefer a custom domain name like yourapp.com?
Assuming you’ve already bought a domain, the first step is to add a DNS record so your domain name will resolve to the IP address of your DigitalOcean droplet. A DNS record tells your browser what to do when they load your domain. In this case, it should go to the IP address of your droplet.
If you’ve not bought a domain, domain registrars like Namecheap sell domain names and often other services such as email and static/CMS hosting, though there are benefits to going with a dedicated hosting and email provider.
Netlify offers hosting for static sites and SiteGround for CMS websites. Office365 and GSuite are the kings of custom email providers. See my guide for Setting Up a Professional Email to read a comparison of Office365 and GSuite.

Login to your domain registrar and go to the advanced DNS settings of your domain. For example, on Namecheap, it’s the Advanced DNS tab on the Manage Domain screen.

You want to add a new record as follows: the type should be set to A, the host should be either @ or blank (depending on your provider), and the value should be the IP Address of your droplet. Repeat the process for the host www which will do the same for the www version of your domain.
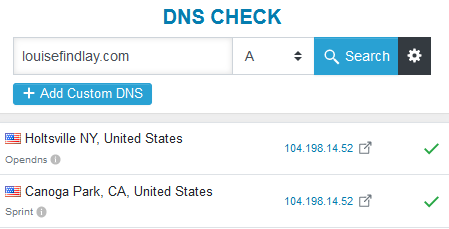
It can take up to 24-48hrs for the changes to process, but it’s usually between 15 minutes to an hour. A quick way to check when it’s done is to go to DNSChecker. Type in your domain name and make sure the type is set to A. When the result comes back as the IP Address of your droplet, then you’ve connected your domain successfully.
The final test is to type your domain name followed by a colon and then the port number (e.g. yourdomain.com:8080). You should now see your web app loading.
Removing the Port Number from your URL
Now that you’ve got a cool domain name hooked up to your web app, you’ll probably want to remove that pesky port number.
We can do this by setting up what’s called a reverse proxy. A reverse proxy will tell your droplet when a user goes to yourdomain.com, it should serve the site at yourdomain.com:8080. We will use the popular reverse proxy Nginx to do so.
The first step is to install Nginx. Type the following to update your package list (so you can get the latest version) and install Nginx:
sudo apt-get update
sudo apt-get install nginx
Since DigitalOcean droplets are created with a firewall enabled, you’ll have to allow Nginx through it so it can work properly. sudo ufw allow 'Nginx Full' will do this.
To check the installation has gone smoothly, go to the http version of your domain name e.g. http://yourdomain.com. If you see a Welcome to Nginx landing page, then it’s been successful.
The second step is to secure your reverse proxy. Currently going to https://yourdomain.com won’t work. That’s because we haven’t configured SSL yet, and we need to install a package called Certbot to do so.
To install Certbot, type the following to ensure you get the latest version:
sudo add-apt-repository ppa:certbot/certbot
sudo apt-get install python-certbot-nginx
Next, you need to add your domain to Nginx so Certbot can generate a certificate to the correct domain. Open the configuration file using sudo nano /etc/nginx/sites-available/default and replace the underscores in the server_name line to your domain. For example, server_name yourdomain.com www.yourdomain.com;. Save the file and exit by typing CTRL+x, y and then enter.
To test that there are no errors in the file, type sudo nginx -t and if there’s none, type sudo systemctl reload nginx to reload Nginx so it will use the updated configuration.
Now we just need to generate the SSL certificate. sudo certbot --nginx -d yourdomain.com -d www.yourdomain.com will start the process. You should choose option 2 for the redirect process because it will forward anyone trying to access the insecure version of your site (http) to the secure (https) version instead.
To test this, go to https://yourdomain.com and you should see the Nginx Welcome screen again.
Finally, we're onto the last step, adding the Nginx configuration for your web app. For demonstration purposes, we'll just modify the default one instead of creating a new one specifically for your web app. If you need to host several web apps on one droplet, you'd need to add a new configuration for each site.
Type: sudo nano /etc/nginx/sites-available/default to edit the default configuration file.
You need to change the server_name parameter to the name of your domain. For example: yourdomain.com. Under location /, proxy_pass should be changed to http://localhost:(port name). The ssl_certificate_key should be modified: /etc/letsencrypt/live/(domain name)/privkey.pem. Finally, add the code block below to the end of the file and then type CTRL+X, and then y to exit.
server {
    if ($host = auroraspotter.space) {
        return 301 https://$host$request_uri;
    } # managed by Certbot
        listen 80 default_server;
        listen [::]:80 default_server;
        server_name auroraspotter.space;
    return 404; # managed by Certbot
Here's a complete example of what it should look like. Note: the server_name should be the name of your domain.
server {
        root /var/www/html;
        index index.html index.htm index.nginx-debian.html;
        server_name auroraspotter.space;

location / {
       proxy_set_header X-Real-IP $remote_addr;
       proxy_set_header X-Forwarded-For $proxy_add_x_forwarded_for;
       proxy_set_header X-NginX-Proxy true;
       proxy_pass http://localhost:8080;
       proxy_set_header Host $http_host;
       proxy_cache_bypass $http_upgrade;
       proxy_redirect off;
 }
    listen [::]:443 ssl ipv6only=on; # managed by Certbot
    listen 443 ssl; # managed by Certbot
    ssl_certificate /etc/letsencrypt/live/auroraspotter.space/fullchain.pem; # managed by Certbot
    ssl_certificate_key /etc/letsencrypt/live/auroraspotter.space/privkey.pem; # managed by Certbot
    include /etc/letsencrypt/options-ssl-nginx.conf; # managed by Certbot
    ssl_dhparam /etc/letsencrypt/ssl-dhparams.pem; # managed by Certbot
}
server {
    if ($host = auroraspotter.space) {
        return 301 https://$host$request_uri;
    } # managed by Certbot

        listen 80 default_server;
        listen [::]:80 default_server;

        server_name auroraspotter.space;
    return 404; # managed by Certbot
To test that there are no errors in the file, type sudo nginx -t. If there’s none, type sudo systemctl reload nginx to reload Nginx so it will use the updated configuration.
Finally, you should be able to go to yourdomain.com and your web app will be running.
Running the App on Boot (Setting up a Process Manager)
You've hooked your domain name up to your droplet and configured Nginx to serve your web app, but how do you keep it running all the time especially after restarting your droplet?
That's where a process manager comes in. It will manage your Node.js web app, log any errors, and start/stop it as needed. We will be using the process manager called PM2.
The first step is to install PM2 using sudo npm install pm2@latest -g. Next, to run it on boot, run pm2 startup systemd. It should say to setup the startup script, copy and paste the following command which will be sudo env PATH=$PATH:/usr/bin /usr/lib/node_modules/pm2/bin/pm2 startup systemd -u (username) --hp /home/(username).
If you're using the default login that DigitalOcean provided, this will be root. Type this into the terminal and press enter. If it says command successfully executed (like below) then it has worked.
[ 'systemctl enable pm2-root' ]
[PM2] Writing init configuration in /etc/systemd/system/pm2-root.service
[PM2] Making script booting at startup...
[PM2] [-] Executing: systemctl enable pm2-root...
[PM2] [v] Command successfully executed.
Using the cd command, navigate to the folder of your web app. Then type pm2 start server.js. This will start the web app using pm2. Afterward, type pm2 save which will save it to be started on boot. If it says successfully saved, then it's been saved correctly.
[PM2] Saving current process list...
[PM2] Successfully saved in /root/.pm2/dump.pm2
Finally, type sudo systemctl start pm2-(username).
Try restarting your droplet by typing reboot and after a few minutes, go to yourdomain.com. Your web app should be up and running like normal.
If you're looking to build on the skills you’ve learned in this tutorial, I suggest using EJS templating to work with APIs and databases.