
In this blog, I am going to walk through developing a web application using ASP.NET Core 5.0, connecting it to a database using Entity Framework Core 5.0, and performing CRUD operations. For the purpose of demonstration, I am going to develop a sample application for inventory management with basic operations.
.NET 5.0 is the next version of .NET Core and .NET Framework. The .NET 5.0 preview includes the following features:
- NET Core 5.0 preview 2.0
- Entity Framework Core 5.0 preview 2.0
- Support for Windows ARM64
- Regular expression performance improvements
- Garbage Collector improvements
This blog post will discuss the following:
- Prerequisites
- Creating an ASP.NET Core web application
- Installing necessary NuGet packages
- Creating database and connect with application
- Adding data validation
- Creating a products controller
- Performing CRUD operations
- Running the application
- Migrating to ASP.NET Core 5 from ASP.NET Core 3. *
- Sample application
- Conclusion
Note: For developing this demo application, I have used ASP.NET Core 5.0 Preview 2, Entity Framework Core 5.0 Preview 2, and Visual Studio 2019 16.6.0 Preview 2.0.
Prerequisites
Make sure that the necessary software is installed:
- Visual Studio 2019 16.6.0 Preview 2.0
- .NET 5.0 Preview 2.0 SDK
- SQL Server 2017
Create ASP.NET Core web application
Follow these steps to create an ASP.NET Core application:
Step 1: Open Visual Studio.
Step 2: Click File a New Project.
Step 3: Select the ASP.NET Core Web Application template and click Next.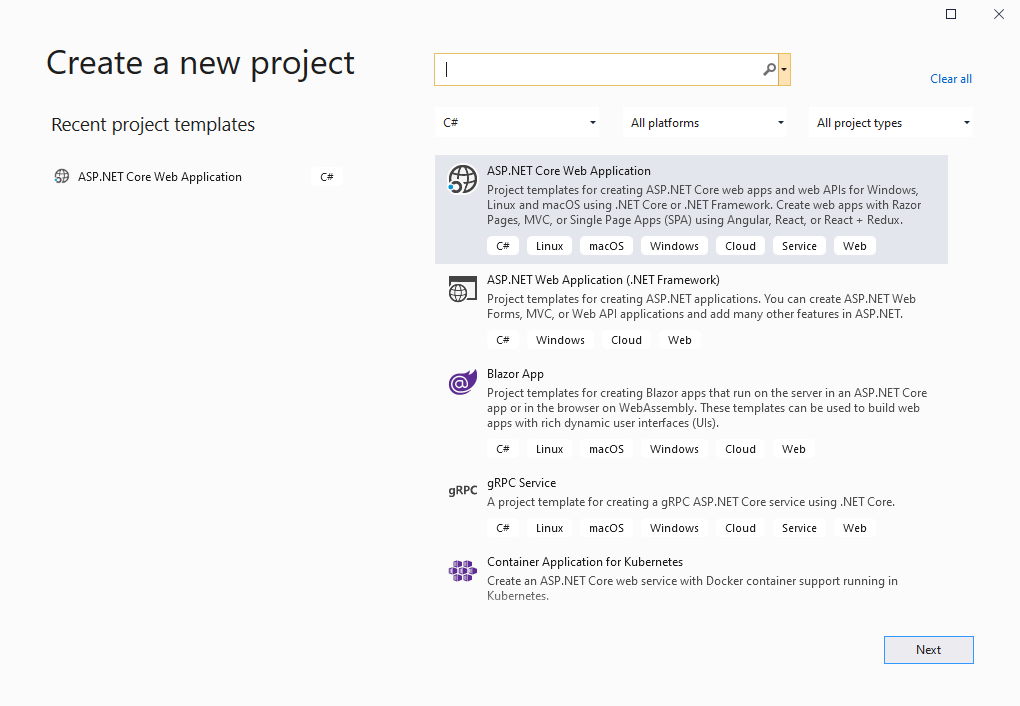
Step 4: Enter the Project name and click Create. The project template dialog will be displayed.
Step 5: Select .NET Core, ASP.NET Core 5.0, and the Web Application (Model-View-Controller) template (highlighted in the following figure).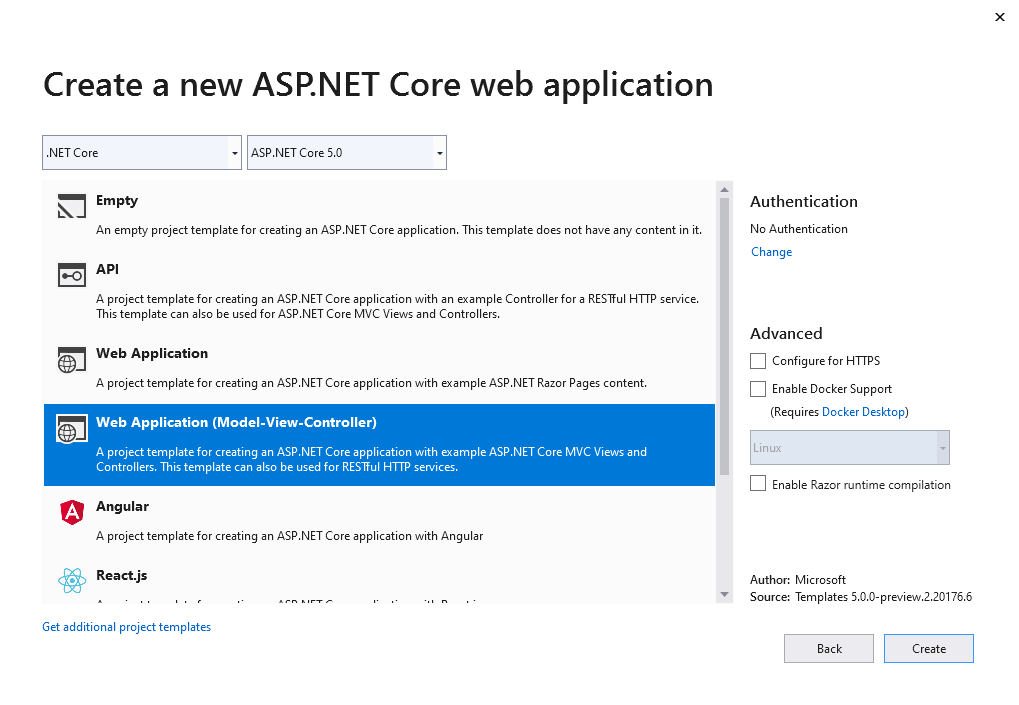
Step 6: Click Create. Then the sample ASP.NET Core web application will be created. Find the project structure in the following screenshot.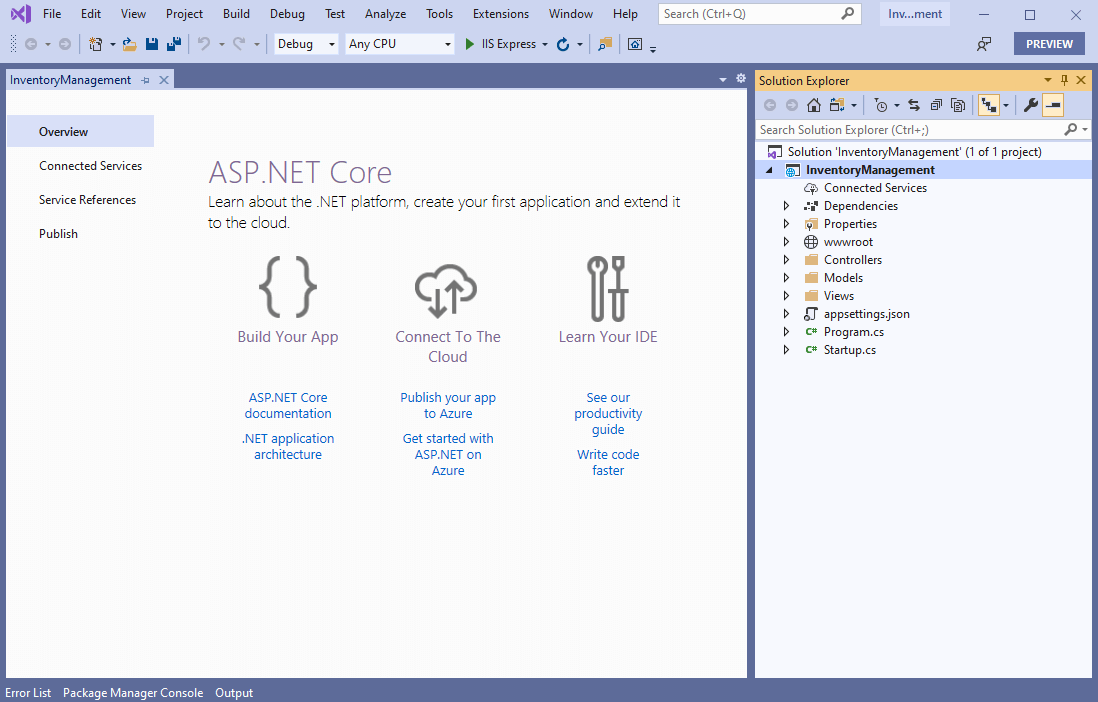
Install necessary NuGet packages
The following NuGet packages should be added to work with the SQL Server database.
Step 1: Click Tools à NuGet Package Manager à Package Manager Console.
Step 2: Run the following commands in the Package Manager Console:
- Install-Package Microsoft.EntityFrameworkCore.Tools -Version 5.0.0-preview.2.20159.4
– This package helps to create database context and the model class from the database.
- Install-Package Microsoft.EntityFrameworkCore.SqlServer -Version 5.0.0-preview.2.20159.4
– The database provider allows Entity Framework Core to work with SQL Server.
Create a database and connect it with the application
I hope you have installed SQL Server 2017 on your machine. (You can use SQL Server 2008, 2012, or 2016).
Step 1: Create a new database (Inventory).
Step 2: For this application, I am going to create a table called Products with basic attributes. Paste the following SQL query into the query window and run it to create the table.
Create Table Products(
ProductId Int Identity(1,1) Primary Key,
Name Varchar(50) Not Null,
Category Varchar(30),
Color Varchar(15),
UnitPrice Decimal Not Null,
AvailableQuantity Int Not Null,
CreatedDate DateTime Default(GetDate()) Not null)
GO
Step 3: Run the following scaffold command in the Package Manager Console to reverse engineer the database and create the database context and entity POCO classes from tables. The scaffold command will create POCO classes only for the tables that have a primary key.
Scaffold-DbContext “Server=******;Database=Inventory;Integrated Security=True” Microsoft.EntityFrameworkCore.SqlServer -OutputDir Models
The details of this command are as follows:
- Connection: Sets the connection string of the database.
- Provider: Sets which provider is to be used to connect the database.
- OutputDir: Sets the directory where the POCO classes are to be generated.
The Products class and Inventory context class will be created, as shown in the following screenshot.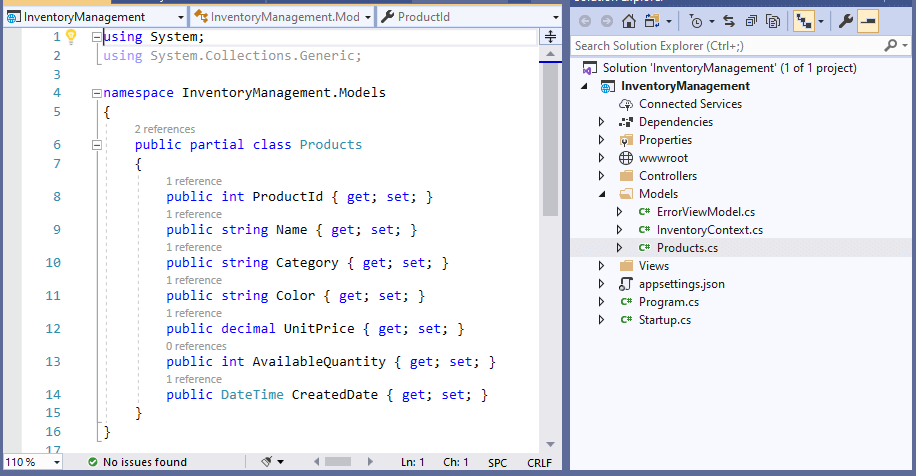
In the automatically generated Inventory Context class file, you can see that the database credentials are hard coded in the OnConfiguring method. It is not good practice to have SQL Server credentials in the C# class. So, remove the following OnConfiguring method and parameterless constructor from the context file (highlighted).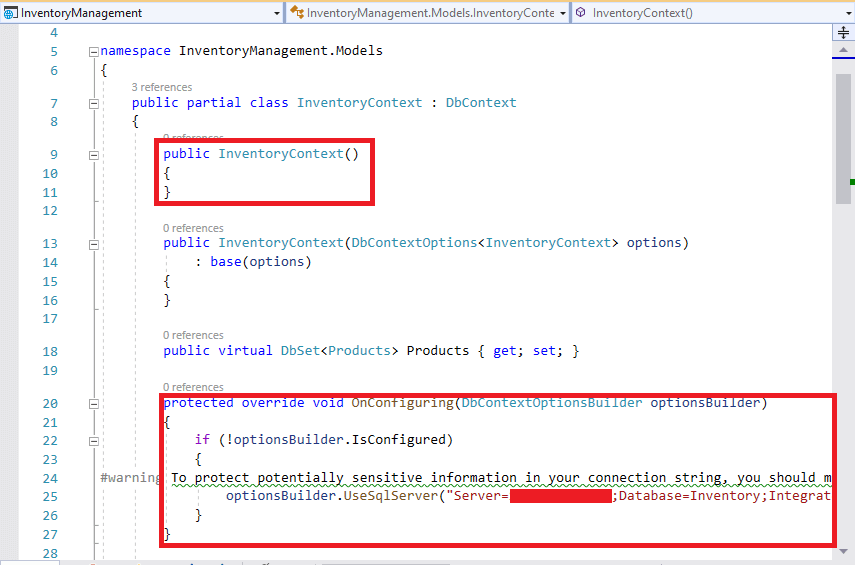
Then add the connection string to the appsetting.json file, as shown in the following screenshot.
Then register the database context service (InventoryContext) during the application startup. The connection string is read from the appsetting file in the following code and passed to the context service.
var connectionString = Configuration.GetConnectionString("InventoryDatabase");
services.AddDbContextPool<InventoryContext>(option => option.UseSqlServer(connectionString));
Add the following code in the ConfigureServices method of the Startup file, as shown in the following screenshot.
Whenever a new context is requested, it will be returned from the context pool if it is available, otherwise, a new context will be created and returned.
Add data validation
Now we will see how to validate data when adding and editing product details. The validation can be applied using Data Annotation and ModelMetadataType.
Step 1: Add a class named ProductsMetaData in the model folder and replace that file with the following code.
using Microsoft.AspNetCore.Mvc;
using System.ComponentModel.DataAnnotations;

namespace InventoryManagement.Models
{
    [ModelMetadataType(typeof(ProductsMetaData))]
    public partial class Products
    {
    }

    public class ProductsMetaData
    {
        [Required]
        [MaxLength(100)]
        public string Name { get; set; }

        [Required]
        [Display(Name = "Unit price")]
        public decimal UnitPrice { get; set; }

        [Required]
        [Display(Name = "Available quantity")]
        public int AvailableQuantity { get; set; }
    }
}
Step 2: In this code, the Products class is declared as partial, and the ModelMetadataType attribute is added with ProductsMetaData. In the ProductsMetaData class, we added the necessary validation for the product’s properties. In this sample, I have applied the required validations and set display names for some properties.
You can find more about data validation in Microsoft’s tutorials.
Create products controller
Step 1: Right-click on the controller folder, select add new item, and then select controller. Then the following dialog will be displayed.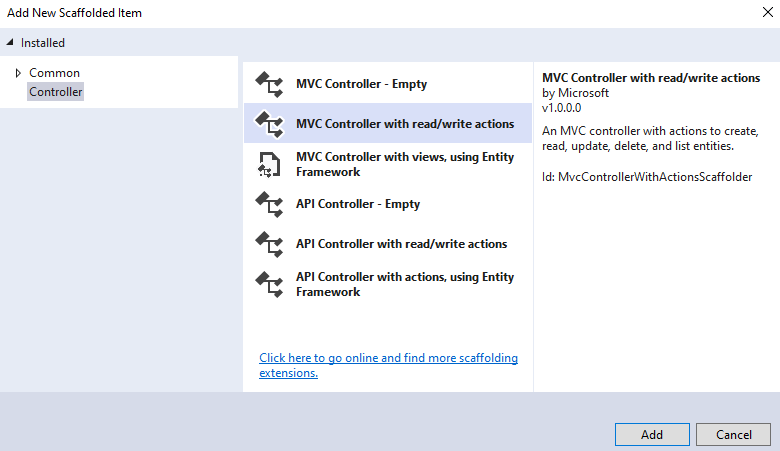
Select the MVC Controller with read/write actions option and click Add.
Step 2: In the dialog, provide ProductsController.cs as the name and click Add. Now the following basic code will be generated.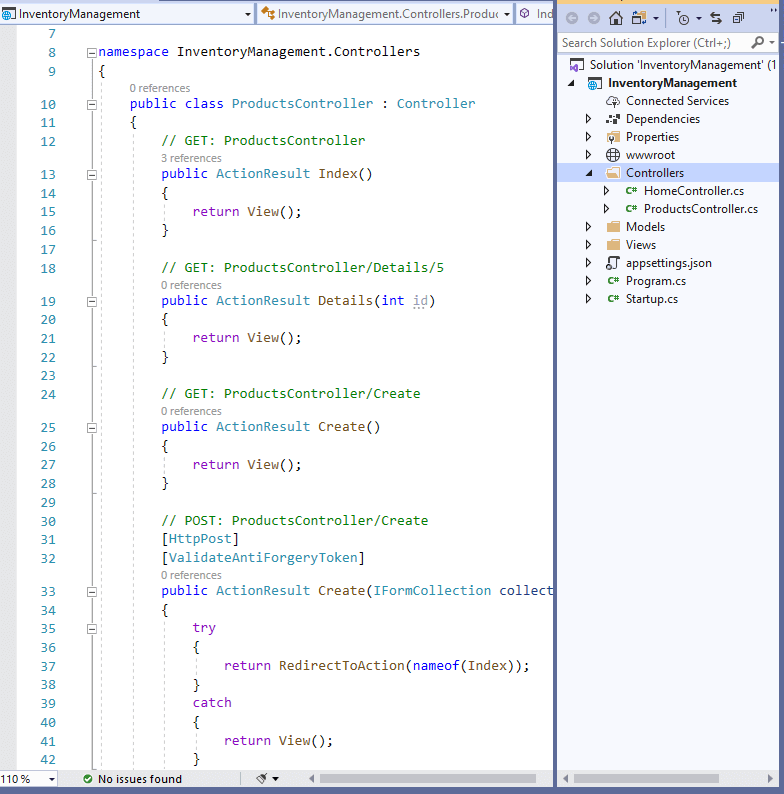
Step 3: Now, change the default application route to load the Products Controller instead of the home controller.
Step 4: Open the Startup.cs file and under the Configure method, change the default controller to Products.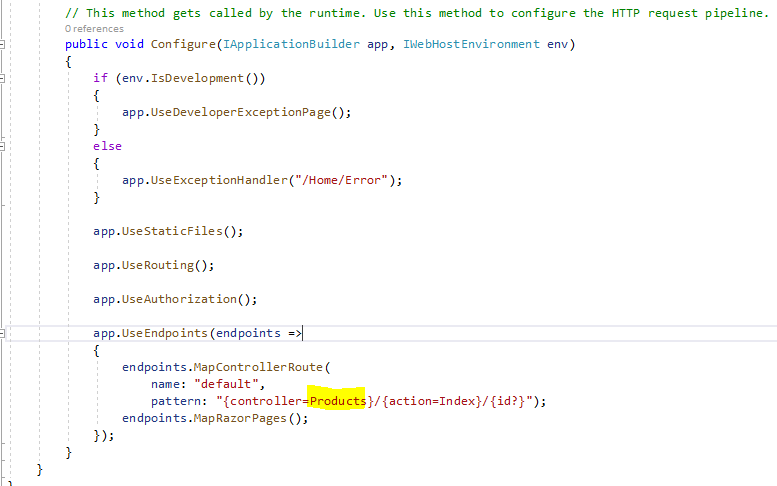
Perform CRUD operations
Now, we will modify the controller actions to perform CRUD operations on InventoryContext.
Add controller action
Step 1: Inject InventoryContext with the products controller’s constructor, as shown in the following screenshot.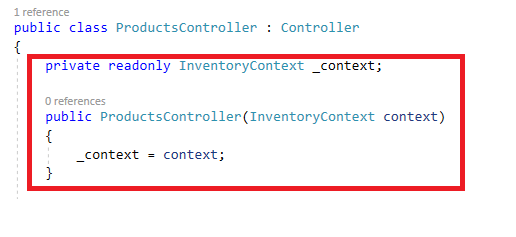
Whenever the products controller is requested, an InventoryContext is returned from the context pool.
Step 2: Replace the controller with the following code.
using System.Linq;
using System.Threading.Tasks;
using InventoryManagement.Models;
using Microsoft.AspNetCore.Mvc;
using Microsoft.EntityFrameworkCore;

namespace InventoryManagement.Controllers
{
    public class ProductsController : Controller
    {
        private readonly InventoryContext _context;

        public ProductsController(InventoryContext context)
        {
            _context = context;
        }

        // GET: Products
        public async Task<IActionResult> Index()
        {
            var products = await _context.Products.ToListAsync();

            return View(products);
        }

        // GET: Products/Details/5
        public async Task<IActionResult> Details(int? id)
        {
            if (id == null)
            {
                return NotFound();
            }

            var product = await _context.Products.FirstOrDefaultAsync(m => m.ProductId == id);

            if (product == null)
            {
                return NotFound();
            }

            return View(product);
        }

        // GET: Products/Create
        public IActionResult Create()
        {
            return View();
        }

        // POST: Products/Create
        // To protect from overposting attacks, please enable the specific properties you want to bind to. For
        // more details see http://go.microsoft.com/fwlink/?LinkId=317598.
        [HttpPost]
        [ValidateAntiForgeryToken]
        public async Task<IActionResult> Create([Bind("ProductId,Name,Category,Color,UnitPrice,AvailableQuantity")] Products products)
        {
            if (ModelState.IsValid)
            {
                _context.Add(products);
                await _context.SaveChangesAsync();

                return RedirectToAction(nameof(Index));
            }

            return View(products);
        }

        // GET: Products/Edit/5
        public async Task<IActionResult> Edit(int? id)
        {
            if (id == null)
            {
                return NotFound();
            }

            var product = await _context.Products.FindAsync(id);

            if (product == null)
            {
                return NotFound();
            }

            return View(product);
        }

        // POST: Products/Edit/5
        // To protect from overposting attacks, please enable the specific properties you want to bind to. For
        // more details see http://go.microsoft.com/fwlink/?LinkId=317598.
        [HttpPost]
        [ValidateAntiForgeryToken]
        public async Task<IActionResult> Edit(int id, [Bind("ProductId,Name,Category,Color,UnitPrice,AvailableQuantity")] Products updatedProductDetails)
        {
            if (id != updatedProductDetails.ProductId)
            {
                return NotFound();
            }

            var product = await _context.Products.FindAsync(id);

            if (product == null)
            {
                return NotFound();
            }

            if (ModelState.IsValid)
            {
                try
                {
                    product.Name = updatedProductDetails.Name;
                    product.Category = updatedProductDetails.Category;
                    product.Color = updatedProductDetails.Color;
                    product.UnitPrice = updatedProductDetails.UnitPrice;
                    product.AvailableQuantity = updatedProductDetails.AvailableQuantity;

                    _context.Update(product);
                    await _context.SaveChangesAsync();
                }
                catch (DbUpdateConcurrencyException)
                {
                    if (!ProductsExists(updatedProductDetails.ProductId))
                    {
                        return NotFound();
                    }
                    else
                    {
                        throw;
                    }
                }

                return RedirectToAction(nameof(Index));
            }

            return View(updatedProductDetails);
        }

        // GET: Products/Delete/5
        public async Task<IActionResult> Delete(int? id)
        {
            if (id == null)
            {
                return NotFound();
            }

            var products = await _context.Products.FirstOrDefaultAsync(m => m.ProductId == id);

            if (products == null)
            {
                return NotFound();
            }

            return View(products);
        }

        // POST: Products/Delete/5
        [HttpPost, ActionName("Delete")]
        [ValidateAntiForgeryToken]
        public async Task<IActionResult> DeleteConfirmed(int id)
        {
            var product = await _context.Products.FindAsync(id);

            _context.Products.Remove(product);
            await _context.SaveChangesAsync();

            return RedirectToAction(nameof(Index));
        }

        private bool ProductsExists(long id)
        {
            return _context.Products.Any(e => e.ProductId == id);
        }
    }
}
The actions and their purposes are explained:
Index: Returns all the products from inventory and returns to view.
Details: Returns the product details from the products table by product ID. If the product is not found, then it will return a Not Found result.
Create: Accepts product details as input and creates a new product in the inventory.
Edit: Accepts the product ID and details as input and if the product is found, then it updates the new details in the inventory.
Delete: Gets the product ID as input, requests confirmation, and deletes that product from inventory.
Server-side validation
In the add and edit action, we have added ModelState.IsValid check to ensure the user entered is valid according to the data validation rule we have added to the products metadata class.
If all data annotation rules are passed, then inserting or updating will be made to the database. Otherwise, an error message will be returned to the user.
Also, in the add and edit action parameter, we have used the Bind attribute, which helps to bind only necessary properties from the UI.
Add View:
Step 1: Create a new folder called Products under Views.
Step 2: Click on the Products folder and click Add. Then select View and click the Razor View – Empty template. Add the following five view files:
- Create.cshtml
- Delete.cshtml
- Details.cshtml
- Edit.cshtml
- Index.cshtml
Replace the code in the views with the following code.
Create
@model InventoryManagement.Models.Products

@{
    ViewData["Title"] = "Create";
    Layout = "~/Views/Shared/_Layout.cshtml";
}

<h1>Create</h1>

<h4>Products</h4>
<hr />
<div class="row">
    <div class="col-md-4">
        <form asp-action="Create">
            <div asp-validation-summary="ModelOnly" class="text-danger"></div>
            <div class="form-group">
                <label asp-for="Name" class="control-label"></label>
                <input asp-for="Name" class="form-control" />
                <span asp-validation-for="Name" class="text-danger"></span>
            </div>
            <div class="form-group">
                <label asp-for="Category" class="control-label"></label>
                <input asp-for="Category" class="form-control" />
                <span asp-validation-for="Category" class="text-danger"></span>
            </div>
            <div class="form-group">
                <label asp-for="Color" class="control-label"></label>
                <input asp-for="Color" class="form-control" />
                <span asp-validation-for="Color" class="text-danger"></span>
            </div>
            <div class="form-group">
                <label asp-for="UnitPrice" class="control-label"></label>
                <input asp-for="UnitPrice" class="form-control" />
                <span asp-validation-for="UnitPrice" class="text-danger"></span>
            </div>
            <div class="form-group">
                <label asp-for="AvailableQuantity" class="control-label"></label>
                <input asp-for="AvailableQuantity" class="form-control" />
                <span asp-validation-for="AvailableQuantity" class="text-danger"></span>
            </div>
            <div class="form-group">
                <input type="submit" value="Create" class="btn btn-primary" />
            </div>
        </form>
    </div>
</div>

<div>
    <a asp-action="Index">Back to List</a>
</div>

@section Scripts {
    @{await Html.RenderPartialAsync("_ValidationScriptsPartial");}
}
Delete
@model InventoryManagement.Models.Products

@{
    ViewData["Title"] = "Delete";
    Layout = "~/Views/Shared/_Layout.cshtml";
}

<h1>Delete</h1>

<h3>Are you sure you want to delete this?</h3>
<div>
    <h4>Products</h4>
    <hr />
    <dl class="row">
        <dt class = "col-sm-2">
            @Html.DisplayNameFor(model => model.Name)
        </dt>
        <dd class = "col-sm-10">
            @Html.DisplayFor(model => model.Name)
        </dd>
        <dt class = "col-sm-2">
            @Html.DisplayNameFor(model => model.Category)
        </dt>
        <dd class = "col-sm-10">
            @Html.DisplayFor(model => model.Category)
        </dd>
        <dt class = "col-sm-2">
            @Html.DisplayNameFor(model => model.Color)
        </dt>
        <dd class = "col-sm-10">
            @Html.DisplayFor(model => model.Color)
        </dd>
        <dt class = "col-sm-2">
            @Html.DisplayNameFor(model => model.UnitPrice)
        </dt>
        <dd class = "col-sm-10">
            @Html.DisplayFor(model => model.UnitPrice)
        </dd>
        <dt class = "col-sm-2">
            @Html.DisplayNameFor(model => model.AvailableQuantity)
        </dt>
        <dd class = "col-sm-10">
            @Html.DisplayFor(model => model.AvailableQuantity)
        </dd>
    </dl>

    <form asp-action="Delete">
        <input type="hidden" asp-for="ProductId" />
        <input type="submit" value="Delete" class="btn btn-danger" /> |
        <a asp-action="Index">Back to List</a>
    </form>
</div>
Details
@model InventoryManagement.Models.Products

@{
    ViewData["Title"] = "Details";
    Layout = "~/Views/Shared/_Layout.cshtml";
}

<h1>Details</h1>

<div>
    <h4>Products</h4>
    <hr />
    <dl class="row">
        <dt class = "col-sm-2">
            @Html.DisplayNameFor(model => model.Name)
        </dt>
        <dd class = "col-sm-10">
            @Html.DisplayFor(model => model.Name)
        </dd>
        <dt class = "col-sm-2">
            @Html.DisplayNameFor(model => model.Category)
        </dt>
        <dd class = "col-sm-10">
            @Html.DisplayFor(model => model.Category)
        </dd>
        <dt class = "col-sm-2">
            @Html.DisplayNameFor(model => model.Color)
        </dt>
        <dd class = "col-sm-10">
            @Html.DisplayFor(model => model.Color)
        </dd>
        <dt class = "col-sm-2">
            @Html.DisplayNameFor(model => model.UnitPrice)
        </dt>
        <dd class = "col-sm-10">
            @Html.DisplayFor(model => model.UnitPrice)
        </dd>
        <dt class = "col-sm-2">
            @Html.DisplayNameFor(model => model.AvailableQuantity)
        </dt>
        <dd class = "col-sm-10">
            @Html.DisplayFor(model => model.AvailableQuantity)
        </dd>
    </dl>
</div>
<div>
    <a asp-action="Edit" asp-route-id="@Model.ProductId">Edit</a> |
    <a asp-action="Index">Back to List</a>
</div>
Edit
@model InventoryManagement.Models.Products

@{
    ViewData["Title"] = "Edit";
    Layout = "~/Views/Shared/_Layout.cshtml";
}

<h1>Edit</h1>

<h4>Products</h4>
<hr />
<div class="row">
    <div class="col-md-4">
        <form asp-action="Edit">
            <div asp-validation-summary="ModelOnly" class="text-danger"></div>
            <input type="hidden" asp-for="ProductId" />
            <div class="form-group">
                <label asp-for="Name" class="control-label"></label>
                <input asp-for="Name" class="form-control" />
                <span asp-validation-for="Name" class="text-danger"></span>
            </div>
            <div class="form-group">
                <label asp-for="Category" class="control-label"></label>
                <input asp-for="Category" class="form-control" />
                <span asp-validation-for="Category" class="text-danger"></span>
            </div>
            <div class="form-group">
                <label asp-for="Color" class="control-label"></label>
                <input asp-for="Color" class="form-control" />
                <span asp-validation-for="Color" class="text-danger"></span>
            </div>
            <div class="form-group">
                <label asp-for="UnitPrice" class="control-label"></label>
                <input asp-for="UnitPrice" class="form-control" />
                <span asp-validation-for="UnitPrice" class="text-danger"></span>
            </div>
            <div class="form-group">
                <label asp-for="AvailableQuantity" class="control-label"></label>
                <input asp-for="AvailableQuantity" class="form-control" />
                <span asp-validation-for="AvailableQuantity" class="text-danger"></span>
            </div>
            <div class="form-group">
                <input type="submit" value="Save" class="btn btn-primary" />
            </div>
        </form>
    </div>
</div>

<div>
    <a asp-action="Index">Back to List</a>
</div>

@section Scripts {
    @{await Html.RenderPartialAsync("_ValidationScriptsPartial");}
}
Index
@model IEnumerable<InventoryManagement.Models.Products>

@{
    ViewData["Title"] = "Index";
    Layout = "~/Views/Shared/_Layout.cshtml";
}

<h1>Index</h1>

<p>
    <a asp-action="Create">Create New</a>
</p>
<table class="table">
    <thead>
        <tr>
            <th>
                @Html.DisplayNameFor(model => model.Name)
            </th>
            <th>
                @Html.DisplayNameFor(model => model.Category)
            </th>
            <th>
                @Html.DisplayNameFor(model => model.Color)
            </th>
            <th>
                @Html.DisplayNameFor(model => model.UnitPrice)
            </th>
            <th>
                @Html.DisplayNameFor(model => model.AvailableQuantity)
            </th>
            <th></th>
        </tr>
    </thead>
    <tbody>
@foreach (var item in Model) {
        <tr>
            <td>
                @Html.DisplayFor(modelItem => item.Name)
            </td>
            <td>
                @Html.DisplayFor(modelItem => item.Category)
            </td>
            <td>
                @Html.DisplayFor(modelItem => item.Color)
            </td>
            <td>
                @Html.DisplayFor(modelItem => item.UnitPrice)
            </td>
            <td>
                @Html.DisplayFor(modelItem => item.AvailableQuantity)
            </td>
            <td>
                <a asp-action="Edit" asp-route-id="@item.ProductId">Edit</a> |
                <a asp-action="Details" asp-route-id="@item.ProductId">Details</a> |
                <a asp-action="Delete" asp-route-id="@item.ProductId">Delete</a>
            </td>
        </tr>
}
    </tbody>
</table>
Client-side validation
Notice that in the Add and Edit views, I have rendered the following partial view.
Html.RenderPartialAsync("_ValidationScriptsPartial");
You can find the _ValidationScriptsPartial view in the shared view folder (default file generated by the ASP.NET Web application template), which has the necessary script files to handle validation on the client side.
The client-side validation also works according to the rules we have added to products’ metadata class using data annotation, and it displays validation messages.
Note: In this application, we have used both server-side and client-side validation. The benefit of client-side validation is that it reduces the server round-trip time by preventing form submission to the server when the form is in an invalid state.
Run application
Now we have added the product controller, views, and validations. Let’s see how to run the application. Follow these steps to do so:
Step 1: Click Run to view the application. A new browser tab will open, and you’ll be able to see the product listing page. Since there is no product in the inventory, it will be empty.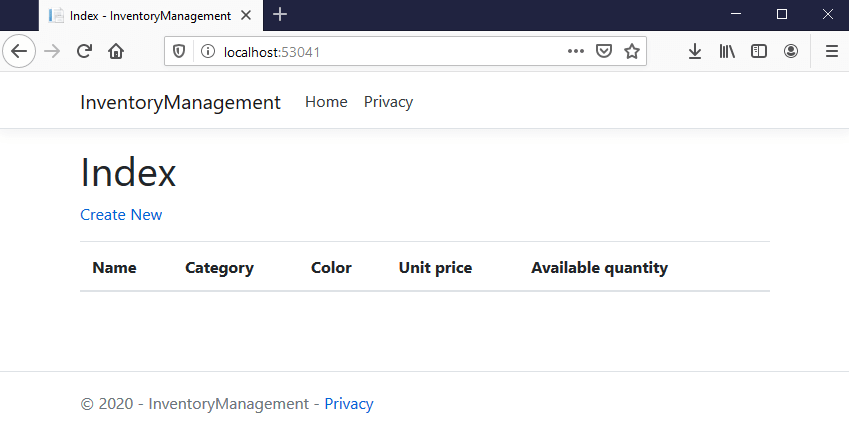
Step 2: Click Create New to add new product to the inventory, and the following screen will be displayed.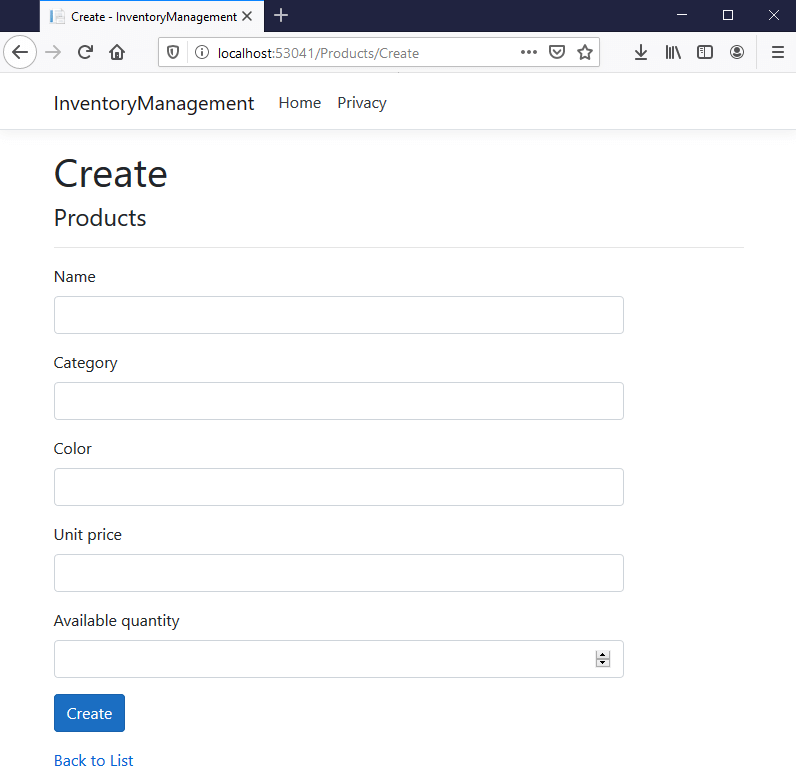
Step 3: Click Create without filling in any data, and you will be able to see the below validation errors, which we added using data annotation,
Step 4: Enter a name, category, color, unit price, and available quantity. Then click Create.
Now we should see a newly created product in the listing page as in the following screenshot. I have added two more products.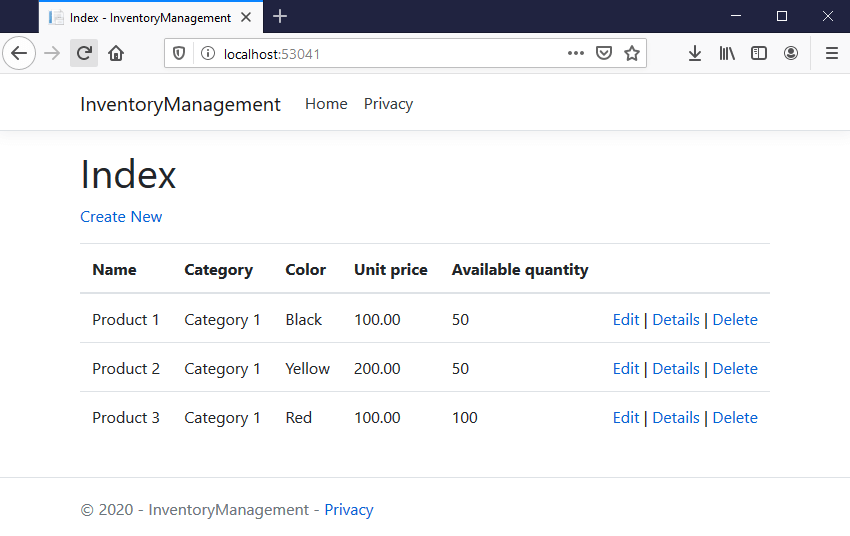
Step 5: Click Details to view the product details.
Step 6: Click Edit to update product details. Modify the products details and click Save. I have modified the available quanilty of Product 1 to 200 and clicked Save.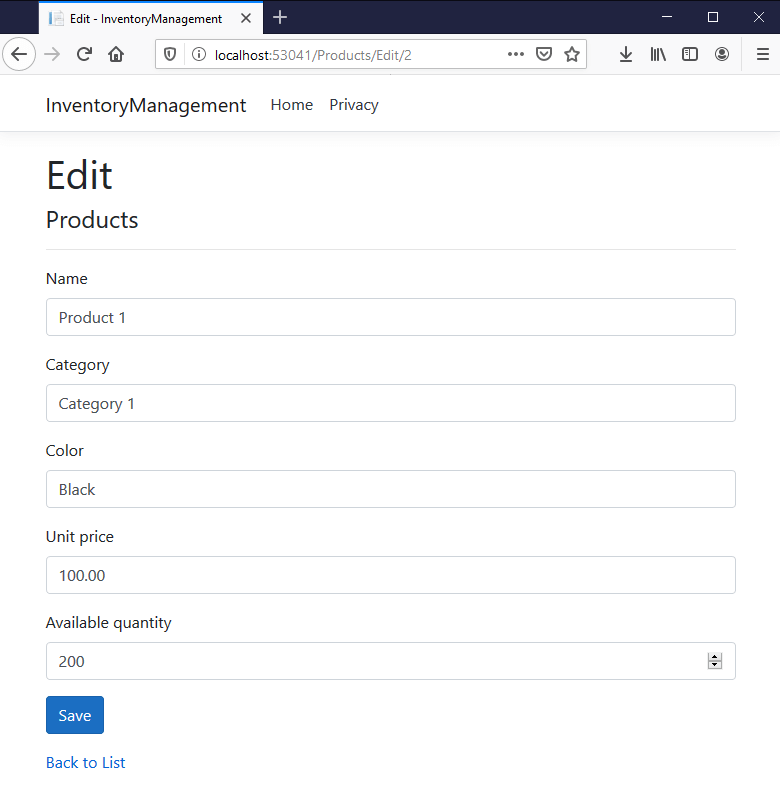
Now the modified quantity will be updated in the database.
Step 7: Click Delete to delete a product. Confirmation will be asked before it’s deleted from the database. By clicking Delete, the product will be deleted from the database.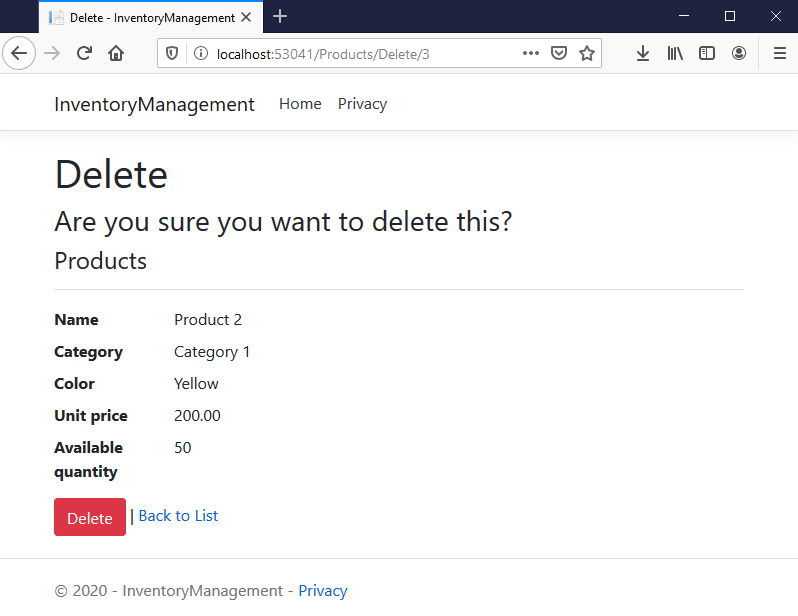
The final inventory products list looks as follows.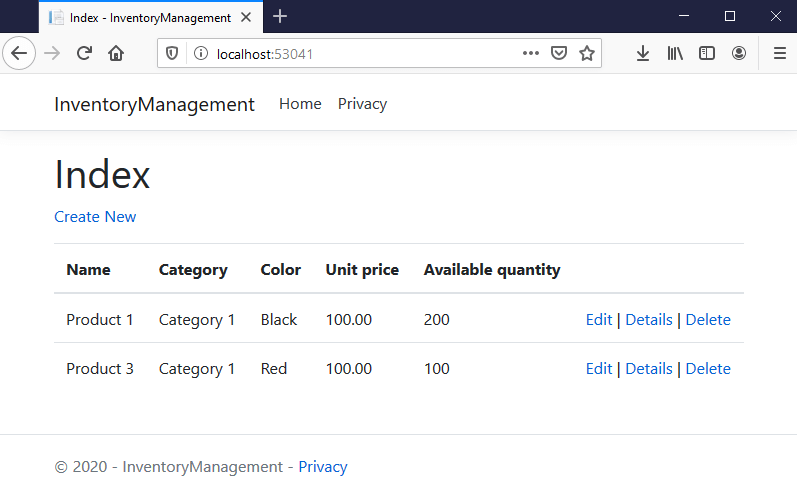
Migrate to ASP.NET Core 5 from ASP.NET Core 3.x
Follow these steps to migrate to the latest version of ASP.NET Core from ASP.NET Core 3.0 or 3.1.
Step 1: Edit the project file and change the TargetFramework to 5.0 as follows.
Step 2: Update all Microsoft.AspNetCore.* package references to 5.0.0–preview.2.20167.3.
Step 3: Update all Microsoft.Extensions.* package references to 5.0.0–preview.2.20167.3.
Step 4: Update all Microsoft.EntityFrameworkCore.* package references to 5.0.0-preview.2.20159.4.
Step 5: Build and run the application. Now your application will run in ASP.NET Core 5.0 with .NET 5.0.
Sample application
I have shared the sample application in this GitHub location. Follow these steps to run the sample:
Step 1: Check out the sample project from the previously linked GitHub location to a location in your disk.
Step 2: Open the solution file using the Visual Studio 2019 Preview 16.6.0 Preview 2.0 or later.
Step 3: Restore the NuGet packages by rebuilding the solution.
Step 4: Change the connection string in the appsettings.json file that points to your SQL Server.
Step 5: Run the project.
Conclusion
In this blog, we have learned how to create an ASP.NET Core 5.0 application and connect it to a SQL database to perform basic CRUD operations using Entity Framework Core 5.0. I hope it was useful. Please share your feedback in the comments section below.
Syncfusion provides over 70 high-performance, lightweight, modular, and responsive ASP.NET Core UI controls such as DataGrid, Charts, and Scheduler, and all of them have built-in support for localization. You can use them to improve your application development.
If you have any questions about this blog, please let us know in the comments section below. You can also contact us through our support forum, support portal, or feedback portal. We are always happy to assist you!


Comments (3)
Hi!
I’m starting with Asp.Net Core MVC and I was able to re-create your example and it’s everything working!
Now I want something simpler. I’m using Syncfusion “ASP.NET Core Data Grid Control”.
I enabled “Dialog Editing”, and I can edit/insert and delete everything on the DataGrid.
But the changes are not persisting!
How to make it’s to use the existing Controller to Persist the Data?
A complete example would be nice! =)
Thanks
Hi Cezar,
You can use the UrlAdaptor to persist edited changes in the Grid in server. This adaptor will send a POST request to server with the changes made in the Grid. We have prepared a simple sample based on your requirement. Please refer to document link and sample link for more information.
https://ej2.syncfusion.com/aspnetmvc/documentation/grid/edit/#persisting-data-in-server
https://www.syncfusion.com/downloads/support/directtrac/general/ze/inventory-management886003453
Please change the connection string into the appsetting.json file as per your location.
In “Create database and connect it with the application” step 3 there is no [Key] before ProductId and without it I got an error (The entity type ‘Products’ requires a primary key to be defined). You also need to add “using System.ComponentModel.DataAnnotations;” at the top of Products.cs. Then it works just fine.
Comments are closed.