A Serverless Function Example: Why & How to Get Started
In a rush? Skip to technical tutorial or live demo
There’s one thing that will always fascinate me about the worldwide dev community:
Our ability to come up with solutions that consistently make our job less painful.
Because let’s be honest, some tasks that come with being a developer are… tedious.
Personally, something like maintaining servers always seems to be a pain in my a**. Not what I signed for at all.
That’s why I’m pretty pumped today to write about serverless architectures and why it’s a programming trend worth learning about.
As we already did for APIs and webhooks, this post serves as an introduction to the concepts behind serverless programming. I also crafted a small serverless app example to get a better understanding of it all.
I’ll cover:
What does “serverless” mean
Why serverless deserves your attention (benefits & limitations)
What are the best use cases & tools
How does it work (with Serverless & AWS Lambda example)
If you’re new to this, you should have a much stronger grasp on what the serverless “revolution” means to web development by the end of this post.
Let’s do this!
What does “serverless“ mean?
The first thing we have to get out of the way is understanding that serverless programming isn’t technically “serverless”.


There are still servers at work somewhere, but they’re abstracted from the developer’s care.
It’s also important to differentiate “serverless” as a concept and “Serverless” the framework, which I’ll also talk about in this piece.
The serverless concept was perhaps first exemplified by function-as-a-service (FaaS) infrastructures, like the well-known AWS Lambda, that featured serverless properties. However, the “serverless” umbrella now covers way more vast grounds. Other types of serverless architectures are seeing the light of day, such as zero-configuration databases and API-centric services.
Again, the shared attribute is that developers don’t need to worry about the underlying infrastructure of these services.
As a part of these serverless architectures are isolated, event-driven programs called “functions” which are pretty narrow in scope. They can run in different contexts, including but not limited to: batch processing on predefined schedules, HTTP calls from in-browser pages, webhook calls from third-party services, and triggers specific to cloud providers (but more on that later).
Serverless, by its server-abstracting nature, falls under the even bigger umbrella-term that is the JAMstack (which, you should know, we love).
We’ll go under the hood in just a little bit to better understand how all of this works. However, there’s another major question I need to answer before going further.
Why should you care about serverless programming?
Between the dozens of programming tools and trends you’ll read about today, why does serverless deserve your attention?
Well, first and foremost, it has immediate business value. By letting developers focus on what they do best, writing code, you improve development efficiency from day one.
Plus, the pricing model of serverless services is somewhat interesting. The cost is execution-based, meaning that you’re charged for the execution time, unlike the 24/7 server maintaining cost of traditional architectures.
These money-saving benefits are playing a significant role in the fast adoption of serverless architectures because they procure this value that business owners can quickly observe. Luckily, they also offer a fair share of benefits for developers themselves.
Benefits for developers
→ Facilitates scaling — There’s really little to no effort to manage capacity when your projects are scaling up. It’s also true for the contrary. Knowing when to scale down is a hard decision to make, but with serverless services billing only on usage, you don’t even have to worry about it.
→ Makes use of existing managed services — Not only does serverless allow you to focus on writing code, but it also helps you reduce code as much as possible. By using existing and managed third-party services, you limit the amount of code needed to run yours.
→ Eradicates server management — Okay, I feel like I’m repeating myself here, but this is a HUGE win for developers going the serverless way.
→ No full-blown web app framework to learn and implement — All you have to concentrate on is writing your app’s logic itself. No request pipeline to configure, no bulky architecture to grasp and understand, no naming conventions to remember.
Limitations
You probably knew this was coming; nothing’s ever 100% perfect.
The main obstacle with serverless is that it inevitably adds an architectural complexity that is not suitable for complex app development. With lots of functions interacting with one another, deployment of such apps can become cumbersome and hard to orchestrate with a serverless infrastructure. Some cloud providers now have ways to deal with the issue, but that’s not a crystal clear story across the board.
Like many of the technologies that fall under the JAMstack umbrella, it might not be mature enough yet to undertake very complex app architectures. However, it might get there soon enough.
Serverless brings all of the benefits mentioned above to smaller projects though, so make sure you know the scale of the job in front of you before choosing the right approach.
Otherwise, there is also the case of cold start delays. These happen when a new instance handles a request for the first time, causing an increase in response time. For some people, it can represent an issue, depending on their requirements.
Best use cases for serverless architectures
This brings us to the when. When should you seriously consider going the serverless route?
If one of the most critical aspects factoring in your decision making is to decrease your go-to-market time, it’s certainly an option worth considering. Serverless architectures are perfect for building lightweight, flexible applications that can be expanded, upscaled or updated quickly.
It’s also true for projects that require lots of computing power for a relatively short amount of time. In other words, apps that see inconsistent usage with peak periods alternating with slower times, who don’t need wasted server power running constantly. In these cases, you could observe important cost reductions from going serverless. Good examples for this are data integration pipelines or machine learning model training.
I also have to mention the natural fit with stateless processes such as email senders or push notification agents. Stateless processes are defined as “intended to support business scenarios that involve short-running logic and have high-performance requirements. Because a stateless process does not persist its state to a database, it is optimized for lower-latency, higher-performance execution.“ Because they run in somewhat sandboxed execution environments, serverless function invocations typically don’t have a long-running memory working set to store data across runs, nor direct access to any persistent filesystem.
Important tools to know about
All of this is well and good, but you won’t go far without knowing the tools that can help you put together a smoothly running serverless application.
The Serverless framework


Serverless is a framework that aims to bring a standard abstraction layer to developing serverless solutions on top of major cloud providers. It also has additional CLI tools to brighten the developer experience: monitoring, secrets management, testing tools, and more. You’ll get the chance to know this framework more intimately in the demo below.
Serverless offerings by major Cloud providers


These cloud providers offer a wide range of serverless functions:
Amazon Web Services (AWS) Lambda — The most well-known and the one I’ll use in my example.
Google Cloud Platform — Look for Cloud Functions and Cloud Run.
Open-source, self-hosted solutions
Okay, now I think we’re ready to go deeper into technical stuff and see what’s really going on when you build a serverless application.
How does it work, exactly?
Any seasoned web developer is probably familiar with the overall architecture of web solutions:
There is generally a client, the part of the app that lives in the browser.
This app relies on one or many remote services to get most non-UI things done.
These services are provided by apps living on servers.
It’s on this last aspect that the serverless paradigm differs from the traditional approach. Let’s take the contact form of your website as an example. In a traditional setup, this functionality would be fulfilled by a dedicated endpoint within the website’s application code, be it PHP, Java, Go or JavaScript. Deploying changes to the form’s submission code is done by deploying the whole application.
What serverless brings to the table here is it allows you to develop this functionality as a completely isolated, single-purpose piece of code. It’s then deployed into a 100% managed, scalable environment, and your website’s code doesn’t even have to know about it. Your frontend code calls this endpoint directly whenever a user submits the form.
In a nutshell, serverless is all about decoupling individual functions of an overall solution into standalone units, using tools and services that abstract away every aspect required to make their code reachable.

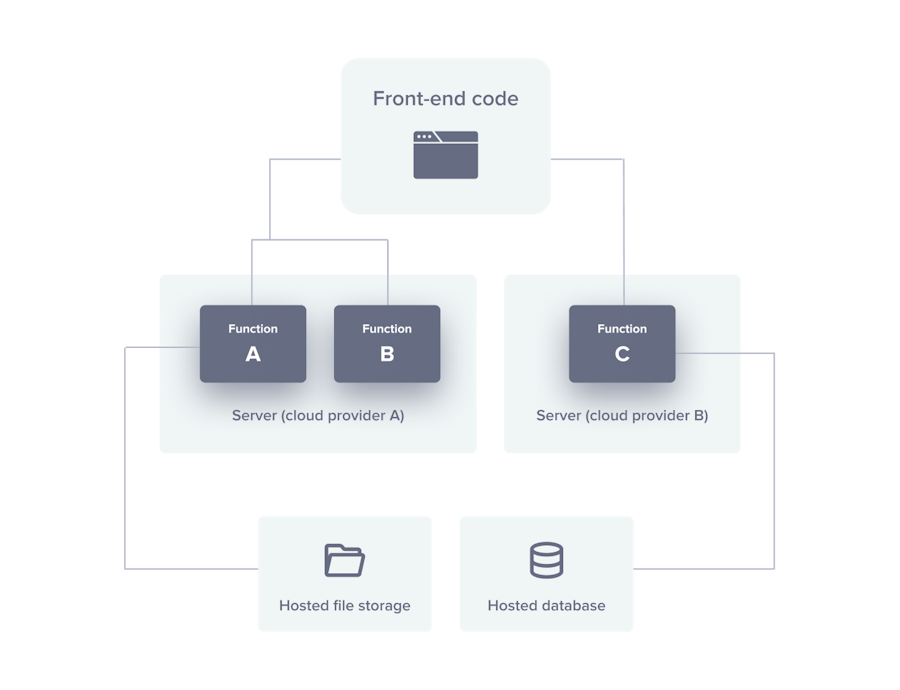
Serverless app architecture
Developers only have to write their code instead of having to deal with physical/virtual servers, networking, runtime environments and security models.
Now, Let’s bring this contact form example to life with a real-world implementation.
Getting started (A serverless app example)
Let’s settle on the tools we’ll use.
We’ll be working with the unambiguously named Serverless framework. The cool thing with this framework is that it features a provider-agnostic abstraction that makes deploying the same function on different cloud providers a breeze.
Since AWS Lambda is the most well-established player in that space, we’ll play it safe and roll with it. It’s also the provider with the deepest and natural integration between their countless serverless offerings.
1. Create a Serverless app
First, let’s run through the signup process. At some point we’re prompted for an application name; we’ll name it “my-contact-form”.
Once this is done, we’re all set and can develop our app locally, so let’s pop a terminal and set this thing up.
$> npm install -g serverless
$> mkdir my-contact-form
$> cd my-contact-form
$> serverless login
At this point, a tab will open in your browser so you can log into your Serverless account. Come back to your terminal once it is done. Then, do the following
$> serverless create --template aws-nodejs-typescript
$> serverless plugin install --name serverless-webpack
$> serverless
Note that since I love Typescript, I’m using the
aws-nodejs-typescripttemplate.
Here you'll be prompted to link your local app to an app in your Serverless dashboard. Complete these steps by linking to the function we created at signup.
2. Deploy to AWS
Next, we have to configure Serverless’s access to your AWS account. I strongly recommend you use the “Access Role” method. Perform these steps to configure your “default” profile to deploy to your AWS account.
Now that this is dealt with, let’s deploy the function for the first time.
$> npm install
$> serverless deploy
The Serverless tools will now take care of all the heavy lifting to get your function up and running within your AWS account. This can take a little while.
Once the deploy is completed, your function will be live at the URL listed in terminal output. You can use Serverless’s built-in invoke command to test it from your terminal.
$> serverless invoke --function helloWhen you want to make changes to your live function, you just have to run serverless deploy again.
Note that from now on, no need to deploy the function every time you need to test it, you can use the handy
invoke localcommand from the Serverless CLI tools.
3. Handle contact form submissions
Now that we’ve gone full circle with our happy path, let’s dive into our use case.
We’ll send emails through Sendgrid, so you’ll need to sign up for an account and create an API key if you don’t have one already.
Let’s install their Node client.
$> npm install --save @sendgrid/mailNow let’s implement the email sending in our handler.ts
All we have to do is tweak the handler.ts file to send an email for each incoming requests.
// handler.ts

import { APIGatewayProxyHandler} from 'aws-lambda';
import * as Sendgrid from '@sendgrid/mail';
import 'source-map-support/register';

interface FormSubmissionPayload {
  sourceName: string;
  fullName: string;
  emailAddress: string;
  message: string;
}

const corsHeader = {
  headers: {
    'Access-Control-Allow-Origin': '*',
    'Access-Control-Allow-Credentials': false
  }
};

export const receiveSubmission: APIGatewayProxyHandler = async (event, _context) => {
  const payload = JSON.parse(event.body) as FormSubmissionPayload;
  Sendgrid.setApiKey(process.env.SENDGRID_API_KEY);
  try {
    const [response] = await Sendgrid.send({
      subject: `Message from ${payload.fullName} on ${payload.sourceName}`,
      personalizations: [{ to: { email: 'contact@example.com' } }],
      from: { name: payload.fullName, email: payload.emailAddress },
      content: [{ type: "text/plain", value: payload.message }]
    });
    if (response.statusCode < 300) {
      return { statusCode: 200, body: 'email_sent', ...corsHeader };
   }
    console.error(response.statusCode);
    return { statusCode: 400, body: 'error', ...corsHeader };
  }
  catch (err) {
    console.error(err);
    return { statusCode: 400, body: 'error', ...corsHeader };
  }
}
That’s pretty straightforward code. Few things to note here:
We define an interface for our input payload structure
We pull our Sendgrid API key from environment variables (we’ll get to in a moment)
The
hellofunction has been renamedreceiveSubmission
Now, our service definition must be adapted, so it fits our adjustments. Head over to serverless.yml and make the functions section looks like this:
# serverless.yml

functions:
  receiveSubmission:
    handler: handler.receiveSubmission
    events:
      - http:
          method: post
          path: submit
          cors:
            origin: '*'
            allowCredentials: false
Plus, make sure the providers section look like this:
# serverless.yml

provider:
  name: aws
  runtime: nodejs10.x
  environment:
    SENDGRID_API_KEY: ${secrets:SENDGRID_API_KEY}
See this environment section we added? That’s what will allow Serverless CLI to set it on AWS Lambda when you deploy your function. Setting ${secrets:SENDGRID_API_KEY} as its value tells the CLI to pull this value from your Serverless account’s secrets store.
You’ll have to add the secret in your “default“ profile, like so:


Note that to test locally, you’ll have to set the
SENDGRID_API_KEYenvironment variable in your current session.
Aaaaaaand your all set! Now all you have to do is wire some front-end code, so it calls this endpoint. You can use the live demo below as a starting point.
4. Going live
Although this tutorial gets you up and running quickly with your contact form, here are a few extra things to consider if you want to make a production-ready setup using this method:
You should combine a set of anti-spam strategies to prevent bots from flooding your inbox.
CORS rules should be carefully crafted to fit your usage.
You should return structured error payloads, so your front-end can react (pun intented) gracefully
You should make extensive use of Serverless’s Deployment Profiles if you plan to integrate this into your CI/CD pipeline
Live demo & GitHub repo
Here's our fully-functioning contact form:
See the Pen Snipcart - Intro to serverless by Francis Cote (@thatfrankdev) on CodePen.
Visit the GitHub repo here
Closing thoughts
The serverless space is moving at an incredible pace; cloud providers are constantly adding new offerings and covering new use cases.
The big challenge right now in serverless is how large teams can manage to deploy full-scale, multi-functions applications (did someone say microservices using this approach. There is a real DevOps puzzle in orchestrating the atomic deployment of every piece of these complex meshes in a graceful way.
If you want to keep up with the latest serverless goodness, I highly recommend this finely curated weekly newsletter.
P.S.: Please remember, there is always a server!
If you've enjoyed this post, please take a second to share it on Twitter. Got comments, questions? Hit the section below!


