Static Site Search Made Easy (with Hugo Tutorial)
“Command + F.”
That function has become a larger part of my life than I care to admit. But it’s true.
Don’t get me wrong, I enjoy getting lost in the infinite abyss of digital content, but when I know exactly what I want, I don’t enjoy spending hours finding it. Hell, even minutes feel too long.


And while “Command + F” is great for searching pages, what if I’m searching an entire site? Or better yet, an entire static site like Hugo?
Today we'll be looking at how a static site search feature can be integrated into your JAMstack site via plugins or 3rd-parties. We’ll be doing this with Algolia’s DocSearch, a killer software that makes adding search to your technical documentation ridiculously easy no matter what SSG you’re using.
More specifically, in this post, we’ll cover:
Let's dive in!
Choosing a static site generator
Before adding search to a static site, we need a... wait for it... static site.
If you’ve been following our blog, then you’re definitely no stranger to our love of the JAMstack and we've done a fair amount of writing on popular static site generators. What we haven’t looked at, however, are how “search-friendly” these SSGs are. Here’s a quick look at our top 5 static site generators for 2019 and which search tools they work with:
Gatsby: Adding searchable text to Gatbsy is pretty straightforward, and they recommend three tools: Algolia (which we’ll cover a bit further down), elasticlunr, and js-search.
Jekyll: Is good with any JS-based search bar integration but popular with lunr.js and Simple Jekyll Search.
Next.js: Like Jekyll, can be used with an JS-based tool but lunr.js looks like the most used solution at the moment.
Nuxt.js: Not to sound like a broken record, but lunr.js is—unsurprisingly—a popular option.
But to generate a static site search bar for this post, we'll be using Hugo, another extremely popular SSG.
Hugo

Hugo is an open-source static site generator that made its debut in 2013. And man did it come out swinging. Though it’s only been six years, Hugo’s release was right around the time when SSGs were on the rise. It was an awesome tool even back then but the competition was admittedly smaller. Nowadays, with the hundreds of SSGs available, we’re still happy to see Hugo has stood the test of time.
In other words, in the static site ecosystem, Hugo went from a big fish in a small pond to one of the biggest fish in a large ocean of options.
How has it stayed so dominant? A few reasons, but mainly this:
It’s so 👏 freakin’ 👏 fast. 👏
In terms of Hugo’s speed, it’s definitely leading the pack. Generally speaking, build times with Hugo can come in under 1 second which, as you can imagine, is hard to beat—even by top competitors like Jekyll or Gatsby.
But don’t let its overwhelming speed fool you. Hugo is far from a one-trick pony. It’s also flexible, has a thriving community, and is great for hosting blogs or e-commerce projects. So if you are new to Hugo, I encourage you to check out the following blog post which gives a more in-depth description. Or, if you want to get hands on, you can always test out this project using Stackbit, a free JAMstack tool bundler that will let you build a site with Hugo in minutes, firsthand.
Now that we have our static site, we need to choose a search bar integration. Though lunr.js is definitely a popular option, we decided to try a different route. So, we went with a search tool that is easy to install, incredibly powerful, and totally free: Algolia’s DocSearch. But before diving into DocSearch, we’ll take a minute to learn about it’s parent product, Algolia.
What is Algolia?


Algolia is a SaaS in more ways than one. While it’s technically a “software as a service,” it’s more accurately described as “search as a service.” Searching services are their wheelhouse and they hold tightly to it through various products—which is what makes it such an awesome tool. In this post, we’ll be specifically discussing two aspects of the software: Algolia as a base-level product and DocSearch as their static site search tool.
Algolia Search Bar
Having been started in 2012 by Nicolas Dessaigne and Julien Lemoine, Algolia has quickly grown into a massively used search tool in the developer community. According to Caroline Kuntz’s article on Algolia’s use of Wavefront, by 2016 Algolia had over 1,600 customers and over 12 billion user-generated queries per month. By 2017 it was 21 billion queries and we can only imagine the number has grown since.
In its most basic form, like we’re using it today, Algolia is a database of text content that relies on an API to both insert and request information. Requesting information from the index is done client-side but inserting content into it is generally done from a backend server, build server, developer machine, etc. For all this to work, the developer simply needs to insert their text content to the Algolia database, set their content’s relevance settings, and create their search user interface.
Also, you can configure more advanced/personalized features including—among other things—making custom rankings, running A/B testing, and gathering trackable analytics. It’s all these functions and more that make Algolia such a powerful search tool. Plus, thanks to their own docs, none of the above is terribly complicated.
An Algolia account comes with a variety of pricing ranging from totally free (for small scale projects) to $500/month for their Pro version.
Plus, the Algolia team built a useful little helper, DocSearch, to make their core product answer a common developer problem: allowing them to provide performant, ranked, and hierarchized search features.
Static site search with DocSearch


DocSearch is a really cool product by Algolia that strives to tackle a specific problem: helping developers quickly and easily find the information they need while reading through endless pages of docs. They’re motivation for solving this problem is clearly close-to-home, as described by their own words:
We're kind of scratching our own itch here. As developers, we spend a lot of time reading documentation, and it isn’t always easy to find the information we need. No one's to blame, building a good search is a complex challenge. We just happen to have a lot of experience doing that, and we want to share it with the developer community.
The basic functionality is self-evident. Once you have your technical docs up and running, you can have a powerfully accurate search bar to filter through your content and help users find exactly what they want.
Note: For a live example of this, check out Vue.js’ documentation which is currently running DocSearch. Or just check out our demo. That’s pretty awesome, too.
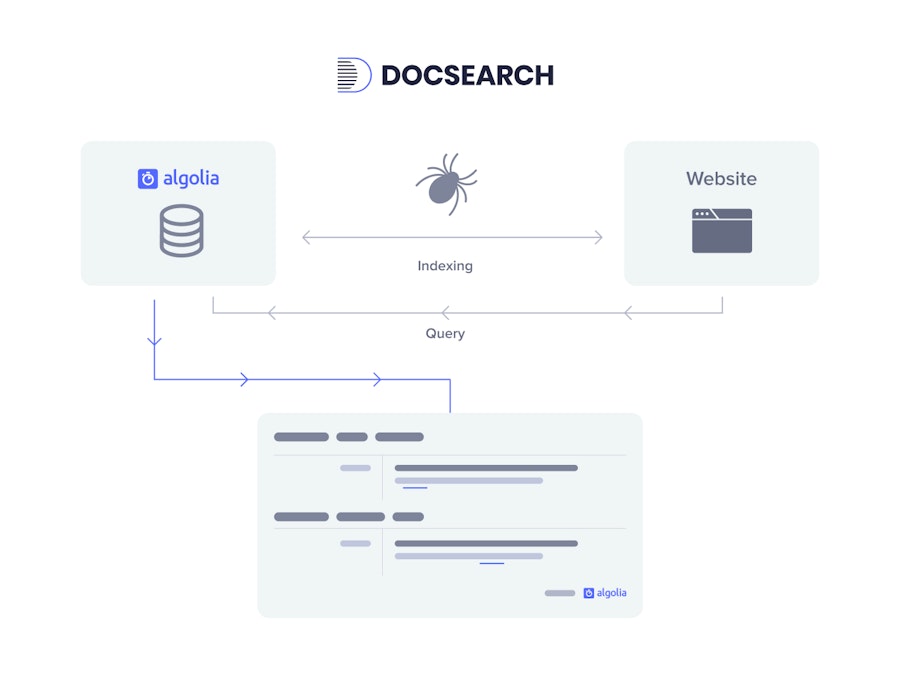
So the big question becomes, how does DocSearch work?


This part is surprisingly simple because everything feels so d*mned automated. Sure, there is some technical stuff going on in the background but there’s very little to do for both users and developers. Nonetheless, let’s take a peek at the man behind the curtain and breakdown what’s going on here.
As mentioned, DocSearch is a software built by Algolia to be used specifically for technical documentation. Yes, you can use it for other content but you’ll need to sign up for an official Angolia account and crawl the site yourself. It can still be free, but you’ll need to sign up.
The difference, however, is that DocSearch crawls your content and configures the search engine completely for you. Then you receive a code snippet to integrate on your site and you’re all set. No messy code, no annoying bugs, and no manual updates (they’ll crawl your content once a day to keep everything as relevant as possible).

Oh, and did I mention it’s totally free?
Yup, you’re reading that right. So long as you don’t mind keeping the “Powered by Algolia” next to your search results, DocSearch doesn’t cost a cent. If you’re concerned about that logo by your results though, you can always take it down by using your own Algolia account and manually running the crawler on your end. This option can still be totally free depending, again, on which plan you choose!
DocSearch and the JAMstack


So this is all well and good, but what made DocSearch really stand out to us here at Snipcart? Well, a few reasons.
Here are some of the direct advantages for developers using DocSearch:
It’s fast - Properly ranked search results show up at the very first keystroke.
It’s cheap - Actually, “cheap” is incorrect because it implies any cost at all. It’s totally free.
Content is hosted externally - Your data is securely hosted by Algolia’s servers giving you one less thing to worry about. You can find out more details concerning their privacy policy here.
But at the end of the day, what really got us excited is how easily DocSearch fits with the JAMstack:
It's easy to integrate - Just like Snipcart, you’ll get a code snippet that allows you to integrate DocSearch into any website, making it versatile enough to fit into the stack of your choosing.
So, without further ado, let's add DocSearch to our Hugo site!
Building our Hugo demo with a static site search feature
Prerequisites
To get started, you'll need the following:
Have Go installed
Create an Algolia account
Create a Netlify account
Have Docker installed and running (optional but recommended for running DocSearch)
Once those are ready to go, we can get started!
Install Hugo
First things first, you'll need to install Hugo to build your static site.
⚠️ Make sure to install the "extended" version to have SCSS support
We'll be using the Book theme by Alex Shpak
hugo new site hugo-docsearch
cd hugo-docsearch
git submodule add https://github.com/alex-shpak/hugo-book themes/hugo-book
cp -rf themes/hugo-book/exampleSite/* .
hugo serve
At this point you will have the site running and accessible via http://localhost:1313.
Deploy to Netlify
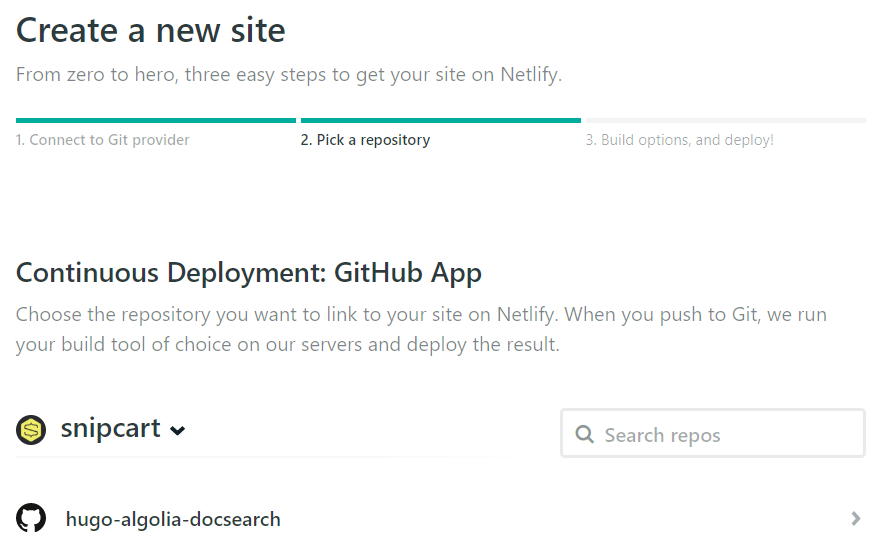
While logged into your Netlify account's dashboard, click "New site from Git" at the top of your site's list.
Once you connect a Git provider, just search for you repository and select it.

Then, Netlify should understand that this repository hosts a Hugo codebase, and set the build steps accordingly so you don't have to touch anything.

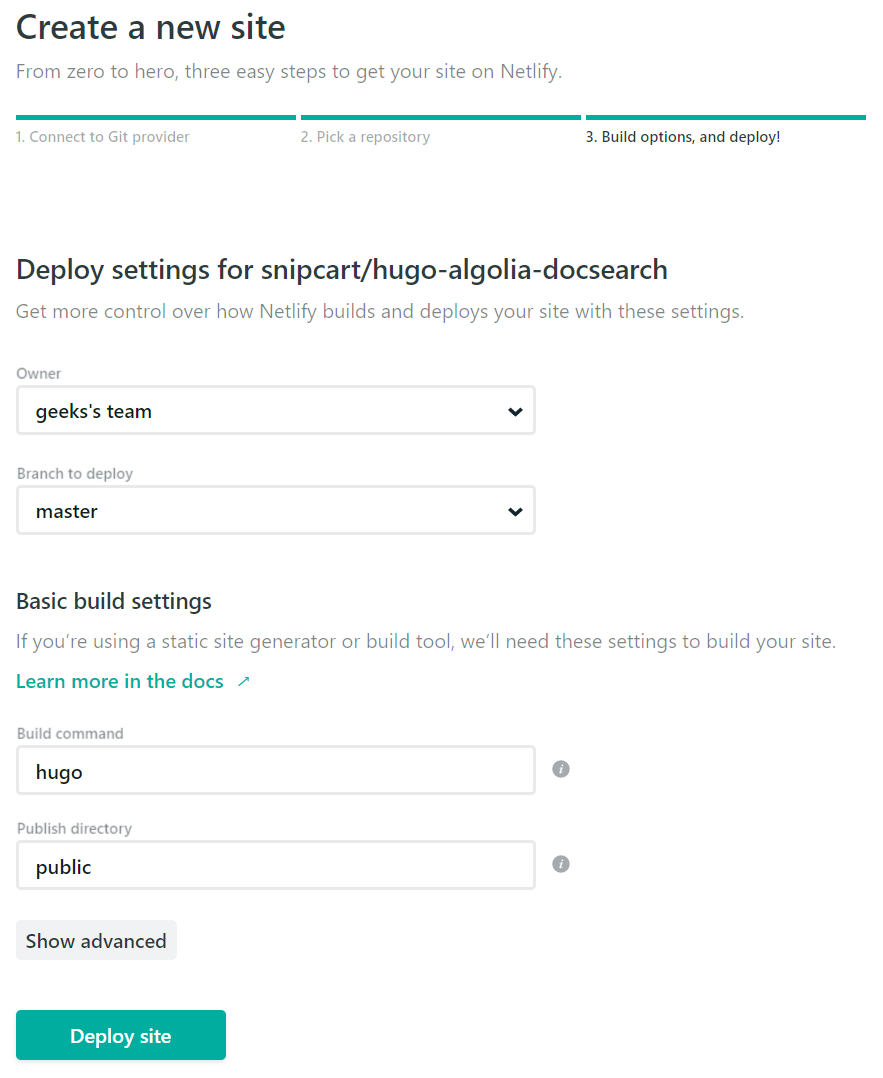
At this point, just hit "Deploy site" and within a minute you'll have your site running at the URL displayed in the "Overview" field.
Now it's time to set up our Hugo search features!
Setup the Algolia index
In your Algolia account, head over to your applications list and hit "New application". Give it a name and select a plan for it. Then click "Create".


You will also have to select the region it will be hosted in. Choose the one closest to where your users will be.
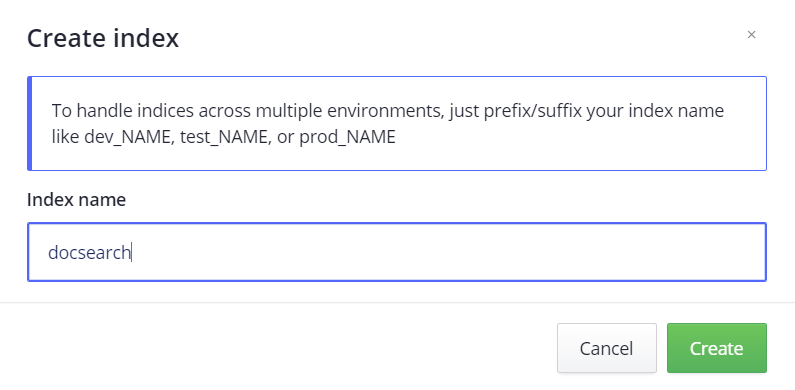
Once the app is created, add the index we'll use for DocSearch

Index content using DocSearch
Like stated earlier, we will run the tool manually. Doing so will upload the structured crawled content in the Algolia index we just created.
First, we'll store our secrets in a new file named .env (do not commit this file). It'll contain our Algolia application Id and its API key. Both are available in the "API Keys" section of the application we just created:
APPLICATION_ID=<APPLICATION_ID>
API_KEY=<ADMIN_API_KEY>
Make sure you are using the "Admin API Key", since DocSearch needs to insert content in the index.
Now we'll have to set DocSearch's configuration for our setup. At repository root, create a docsearch.json file with the following content:
{
  "index_name": "docsearch",
  "start_urls": ["<NETLIFY URL>"],
  "selectors": {
    "lvl0": ".book-brand",
    "lvl1": ".book-page h1, .book-posts h1",
    "lvl2": ".book-page h2, .book-posts h2",
    "lvl3": ".book-page h3, .book-posts h3",
    "text": ".book-page p, .book-posts p"
  }
}
Be sure to add your live site URL in the start_urls array. We are using a very simple configuration, but complex use cases can be covered as well. There are many configuration options to customize the structure of your results.
Once the file is created, you just have to run the tool. I recommend running it via Docker, since it is way simpler.
Note that we're using jq here. It is a neat JSON manipulation tool that allows us to inline our JSON file's content.
docker run -it --env-file=.env -e "CONFIG=$(cat /path/to/your/config.json | jq -r tostring)" algolia/docsearch-scraperTada! Your index is now filled with your site's content. Now, let's enable search on the site itself.
Adding Hugo search functionality with Algolia
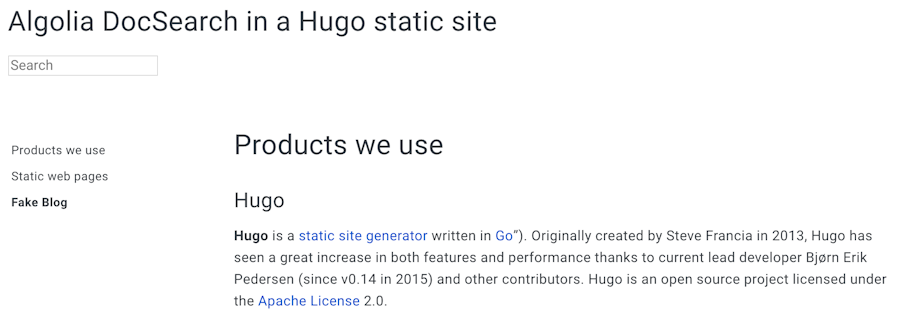
First, add this field anywhere on the site.
<input type="search" class="docsearch-input" placeholder="Search" />Then, include DocSearch's CSS just before closing your <head> tag:
<script src="https://cdn.jsdelivr.net/npm/docsearch.js@2/dist/cdn/docsearch.min.js"></script>
<script>
  docsearch({
    apiKey: '<SEARCH_API_KEY>',
    indexName: 'docsearch',
    appId: '<APP_ID>',
    inputSelector: '.docsearch-input',
    debug: false,
  });
</script>
⚠️It's very important that you use your "Search-Only API Key" here, because it has read-only access to your data as opposed to the "Admin" one that has full access.
Once you commit and push these little changes, Netlify will deploy your site and you're all set!
GitHub Repo and live demo

Closing thoughts
Algolia DocSearch is a valuable tool that make adding search to a static site very straightforward. Here are some aspects you might want to consider for a production ready setup:
Run DocSearch in your continuous delivery pipeline and/or on a schedule. In that case, don't forget to store your secrets in a secure manner
Fine-tune page ranking configuration
Style the results dropdown to your liking
Otherwise, I hope you enjoy playing with DocSearch as much as I do! It's great to see a company give back to the open-source community with such a powerful (and free) tool!
If you’ve enjoyed this post, please take a second to share it on Twitter. Got comments or questions? Hit the comment section below!


