Sponsors


Plotting Stock Market Data in Ionic 2 – Integrating Yahoo Finance API with Charts
In my previous article, we covered charts and graphs and how to do data visualization in Ionic 2. Even though you got the gist of how data visualization is done, we should also look at a real-world application using data visualization. Even though we edited the values in the charts, we only did so manually through hard coding.
One of the most common usages of data visualization is in the world of stock market data. Here, investors watch the market rate of stocks, their highest and lowest stock value in a given time period, in real-time, meaning if some changes happen in the market, then it gets reflected in the data as well as in the charts. This is actually a very useful plotting technique, because charts provide great readability to help in market insight.
It’s not uncommon for stock exchanges all around the world to give you the statistics of their stocks in real-time, so if all you want is to watch the changes in stock prices or to get the stock quotes, then just visit the websites of the exchanges themselves, for example, The New York Stock Exchange (NYSE) has a website (https://www.nyse.com/index) for this purpose. You can find whatever stock quotes you want by searching the different stock exchanges on Google.
Now the real problem is, how to get the stock data and integrate it into our application? Fortunately, Yahoo Finance provides the REST API of their stock quotes, meaning you can call the API and get the data of any symbol in JSON format. Very useful, but the real problem is integrating the data into our charts from our previous application considering that JSON isn’t supported by our charts. We’ll need a sophisticated solution to show the values in our user interface.
![]()
So in this article, I am going to show you how you can integrate the Yahoo Finance API with charts to get the stock quotes in real-time in Ionic 2. Let’s get started!
Plotting Stock Market Data in Ionic 2 – Integrating Yahoo Finance API with Charts
As I mentioned earlier, Yahoo Finance provides an API for getting stock quotes through a REST based URL. So for example, you need to send the GET request of HTTP with an appropriate link that includes all the parameters, which are actually your specifications for the stock data you need to get (don’t scratch your head, we’ll clear it up soon).
Before integrating the API into our application, let’s first clarify how this API really works.
The Yahoo Finance API provides stock quotes in real-time that can be downloaded in CSV format and therefore can be opened with Microsoft Excel. It uses the Yahoo! Query Language (YQL) (https://developer.yahoo.com/yql/) which enables you to query and filter data from supported API’s or data.
YQL is very similar to SQL, but it queries the data from the link/address online rather than a database and gives you data in JSON or XML format. There is a very good explanation of YQL here https://www.quora.com/What-is-YQL.
To get the quotes, you need to start with “http://finance.yahoo.com/d/quotes.csv”, but this won’t give you anything, so we need to append it with “?s=” for parameters/options, followed by the “symbol” of the stock (you can find any symbol you want on stock exchange websites). If you want to add the multiple symbols, then you can do so using the “+” sign.
Then you need to add “&f=” for the information you want (i.e., name, last date, volume, etc.). You can read more about tags here (http://www.marketindex.com.au/yahoo-finance-api). The link http://finance.yahoo.com/d/quotes.csv?s=^AORD+BHP.AX+BLT.L+AAPL&f=nd1l1vr will give you a CSV file to download that includes the information of the symbols you provided.
We will use a similar approach, except we will be using the YQL for querying. Actually, we will use the SQLite plugin (https://ionicframework.com/docs/v2/native/sqlite/) for writing SQL queries that will be translated to YQL.
In our previous application, we used the Chartist.js library for rendering real-time charts. Actually, we will be using this library for plotting the data that we will get from the REST API as this is the only charts library that provides real-time updates (see the asynchronous example in my previous article).
Creating a project
We will be using our previous project, so no need to create a new project. We already have a few pages in our “pages/” folder, so we need to add some new pages.
We will use the SQLite Native library (https://ionicframework.com/docs/v2/native/sqlite/) for executing the queries as the Storage class no longer supports the query method (you can read more about it here (https://github.com/driftyco/ionic/issues/8269)), but the drawback of this approach is that the native plugin can only run in the mobile device, so we can not test our application in the browser. However we can connect the device through a USB and use the Chrome inspect (chrome://inspect/#devices) to see the results in our browser (just click on “inspect” when you see your device, make sure your USB debugging is turned on to see your device).
Let’s add new pages:
$ionic g page stock-list
$ionic g page stock-detail
$ionic g page stock-quote-search
Before editing the pages, first create a new provider:
$ionic g provider stock-infoOpen the “stock-info.ts” and copy the following content:
stock-info.ts
import {Injectable} from '@angular/core';
import {Http} from '@angular/http';
import {Observable} from 'rxjs/Rx';
import 'rxjs/operator/map';
import { Platform } from 'ionic-angular';
@Injectable()
export class StockInfo {
constructor(public http:Http, public platform: Platform) {
}
// https://developer.mozilla.org/en/docs/Web/JavaScript/Reference/Global_Objects/encodeURIComponent
encodeURI(string) {
return encodeURIComponent(string).replace(/\"/g, "%22").replace(/\ /g, "%20").replace(/[!'()]/g, encodeURI);
}
getPriceInfo(symbol) {
let query = `select * from yahoo.finance.quote where symbol IN('${symbol}')`;
let url = 'http://query.yahooapis.com/v1/public/yql?q=' + this.encodeURI(query) + '&format=json&env=store%3A%2F%2Fdatatables.org%2Falltableswithkeys&callback=';
// let url = `https://finance.yahoo.com/webservice/v1/symbols/${symbol}/quote?format=json&view=detail`;
let stocks = Observable.interval(5 * 1000)
.flatMap(()=> {
return this.http.get(url).retry(5);
})
.map(data => {
let jsonData = data.json();
return jsonData.query.results.quote;
});
return stocks;
}
getDetail(symbol) {
let query = `select * from yahoo.finance.quotes where symbol IN ("' ${symbol} '")`;
let url = 'http://query.yahooapis.com/v1/public/yql?q=' + this.encodeURI(query) + '&format=json&env=store%3A%2F%2Fdatatables.org%2Falltableswithkeys&callback=';
return this.http.get(url).map(data => data.json().query.results.quote);
}
getdate(m) {
let d = new Date();
d.setMonth(d.getMonth()-m);
let year = d.getFullYear().toString();
let month = (d.getMonth()+ 1).toString();
let day = d.getDate().toString();
if(month.length === 1) {
month = "0" + month;
}
if(day.length === 1) {
day = "0" + day;
}
let formatted = `${year}-${month}-${day}`;
return formatted;
}
getQuotes(name) {
let url = `https://s.yimg.com/aq/autoc?query=${name}®ion=CA&lang=en-CA`;
return this.http.get(url)
.map(data => {
let result = data.json();
return result.ResultSet.Result;
});
}
getChart(symbol,from=1) {
let todayDate = this.getdate(0);
let fromDate = this.getdate(from);
let query = 'select * from yahoo.finance.historicaldata where symbol = "' + symbol + '" and startDate = "' + fromDate + '" and endDate = "' + todayDate + '"';
let url = 'http://query.yahooapis.com/v1/public/yql?q=' + this.encodeURI(query) + '&format=json&env=store%3A%2F%2Fdatatables.org%2Falltableswithkeys&callback=';
return this.http.get(url).map((data) => {
console.log("getChart(): " + url);
let result = data.json().query.results;
if(result) {
return result.quote
} else {
return [];
}
});
}
}Here, I have defined several methods for getting the quotes and translating the SQL queries to YQL. Most of this code and other code that I will be using later is taken and adopted from Ionic 2 Blueprints repository (https://github.com/ionic2blueprints).
I am using the encodeURIComponent() method from native JavaScript for translating the queries, this method actually replaces the string in URI. You can read more about it here (https://developer.mozilla.org/en/docs/Web/JavaScript/Reference/Global_Objects/encodeURIComponent).
Now, open “stock-list.ts” and copy the following content:
stock-list.ts
import {Component} from '@angular/core';
import {NavController, ModalController, Events} from 'ionic-angular';
import {StockQuoteSearch} from '../stock-quote-search/stock-quote-search';
import {StockDetail} from '../stock-detail/stock-detail';
import { Platform } from 'ionic-angular';
import { SQLite } from 'ionic-native';

import {StockCmp} from '../../component/stock/stock';
import {StockChart} from '../../component/stock-chart/stock-chart';

@Component({
 templateUrl: './stock-list.html',
 providers: [StockCmp, StockChart]
})
export class StockList {

 // Our main quote List which stores all the quote searches
 quoteList = [];
 run:Boolean;

 public db: SQLite;

 constructor(public nav:NavController, public events: Events, public modalCtrl: ModalController, public platform: Platform) {

    this.platform.ready().then(() => {
        this.db = new SQLite();

        var self = this;
       this.db.openDatabase({
            name: 'data.db',
            location: 'default'
            }).then(() => {
            this.db.executeSql("create table IF NOT EXISTS quotes(stock unique, value)", {});
        });

        let returnData: any;
       this.db.openDatabase({
            name: 'data.db',
            location: 'default'
            }).then(() => {
            this.db.executeSql("select * from quotes", {}).then(data => {
            console.log("INSERTED: " + JSON.stringify(data));

         let result = data.rows;
         console.log(result);
         for(let i=0; i < result.length; i++) {
            // Push every quotes from the list (* from quotes....)
            this.quoteList.push(JSON.parse(result.item(i).value));
            console.log("Initial Stock List: " + this.quoteList);
            console.log(result.item(i));
            console.log("Result Item Value: " + result.item(i).value);
         }
        });
            console.log("StockList getAllQuotes Success");
        }, (err) => {
            console.error('Unable to open database: ', err);
        });

        // 'stock:watch' is subsribed here
        this.events.subscribe("stock:watch", (stock, quoteList) => {
         this.quoteList.push(stock);
         console.log("Event subscribed stock[0]: " + stock);
         console.log("Event subscribed: " + this.quoteList);
         console.log("Proper QuoteList: " + quoteList);
        });
    });
  }

 searchQuote() {
   let modal = this.modalCtrl.create(StockQuoteSearch);
   modal.present();
 }

 deleteItem(index, symbol) {
    this.platform.ready().then(() => {
        var self = this;
        let returnData: any;
       this.db.openDatabase({
            name: 'data.db',
            location: 'default' // the location field is required
            }).then(() => {
            this.db.executeSql(`delete from quotes where stock='${symbol}'`, {}).then(()=>{
         this.quoteList.splice(index, 1);
        });
            console.log("StockList removeQuote Success");
        }, (err) => {
            console.error('Unable to open database: ', err);
            console.log("StockList removeQuote Fail");
        });
    });
 }

 // Runs when the page is about to enter and become the active page.
 ionViewWillEnter() {
    this.run = true;
 }

 // Runs when the page is about to leave and no longer be the active page.
 ionViewWillLeave() {
   this.run = false;
 }

 openDetail(quote) {
   this.nav.push(StockDetail, {quote:quote});
 }
}
Ignore the new/undefined components that we are using here for now (we will add the components later). Here, we have imported the SQLite plugin and then we initialized it in our constructor. You can see that I am checking that the platform ready, as not doing so gives errors. And then, we are opening our database, and within this method we are executing queries.
At first, we are creating our “quotes” table if it doesn’t exist. Then, we are pushing all the available quotes in our “quoteList” array. This array will be rendered in our HTML side in the form of lists. We are also using the Events here to track changes on stocks, basically the “subscribe()” method here (the “publish()” method will be included in another component). You can read more about it here (https://ionicframework.com/docs/v2/api/util/Events/).
We are also using “StockQuoteSearch” and “StockDetail” component that we will see later.
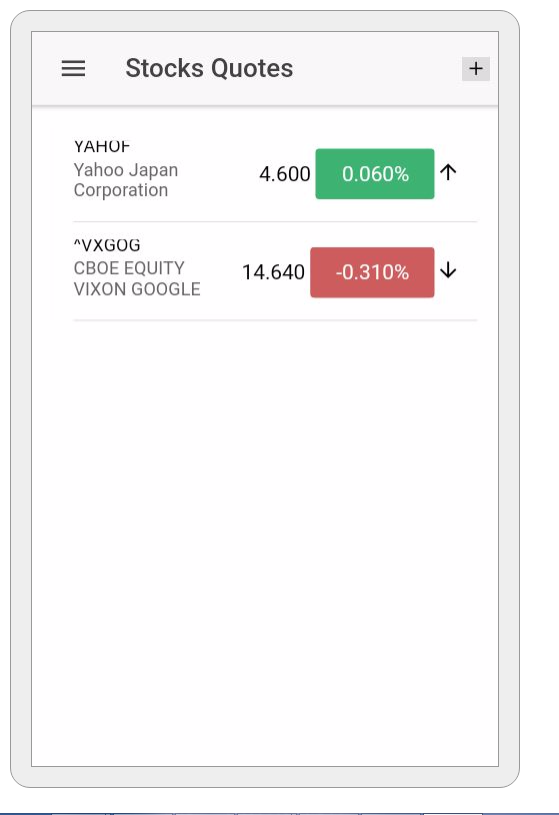
Now, open the “stock-list.html” and copy the following content:
stock-list.html
<ion-header>
 <ion-navbar>
    <button ion-button menuToggle>
     <ion-icon name="menu"></ion-icon>
   </button>
   <ion-title>Stocks Quotes</ion-title>
   <ion-buttons end>
     <button (click)="searchQuote()">
       <ion-icon name="add"></ion-icon>
     </button>
   </ion-buttons>
 </ion-navbar>
</ion-header>

<ion-content padding class="page1">
 <ion-list>
   <stock (click)="openDetail(quote)" *ngFor="let quote of quoteList; let i = index" [run]="run" sliding="true" [info]="quote" (delete)="deleteItem(i, quote.symbol)">
   </stock>
 </ion-list>
</ion-content>
Here, you can see that I am rendering our “quoteList” in the form of <ion-list>. The remaining code should be self-explanatory.
Now, open the “stock-quote-search.ts” and copy the following content:
stock-quote-search.ts
import {Component} from '@angular/core';
import {FormControl} from '@angular/forms';
import {NavController, ViewController, Events} from 'ionic-angular';
import {StockInfo} from '../../providers/stock-info';

import { Platform } from 'ionic-angular';

import { SQLite } from 'ionic-native';

import {StockDetail} from '../stock-detail/stock-detail';

@Component({
   templateUrl: './stock-quote-search.html'
})
export class StockQuoteSearch {
    public db: SQLite;

   searchbar = new FormControl();
   quoteList:Array<any>;

   constructor(public nav:NavController, public stockInfo: StockInfo, public vc:ViewController, public events:Events, public platform: Platform) {
        this.platform.ready().then(() => {
            this.db = new SQLite();

            this.searchbar.valueChanges
            .filter(value => value.trim().length > 2)
            .distinctUntilChanged()
            .debounceTime(2000)
            .subscribe(value => {
                this.search(value);
            });
        });
   }

   search(value) {
       this.stockInfo.getQuotes(value)
       .subscribe(list => {
           this.quoteList = list;
       });
   }

   watch(quote) {
        console.log(quote.symbol);
        console.log(quote.name);
        console.log(this.quoteList);

       this.events.publish("stock:watch", quote, this.quoteList);

        var self = this;
        let quoteEnter: any;
        this.db.openDatabase({
            name: 'data.db',
            location: 'default'
            }).then(() => {
            quoteEnter = quote;
            console.log(quoteEnter);
            console.log(quoteEnter.symbol);
            this.db.executeSql(`insert into quotes values('${quoteEnter.symbol}', '${quoteEnter}');`, {}).then(data => {
            console.log("INSERTED Quote: " + JSON.stringify(data.rows));
            });
            console.log("Quote Search setQuote Success");

        }, (err) => {
            console.error('Unable to open database: ', err);
            console.log("Quote Search Fail");
        });

        this.nav.push(StockDetail, {quote:quote});
   }

   close() {
       this.vc.dismiss();
   }
}
Here, we are defining our search bar that allows you to search the quotes. The results will appear in real-time while you are typing. We are using the “StockInfo” provider here for getting the quotes.
Now, open the “stock-quote-search.html” and copy the following content:
stock-quote-search.html
<ion-header>
   <ion-navbar primary>
       <ion-title>Stock Quote Search</ion-title>
       <ion-buttons end>
           <button (click)="close()"><ion-icon name="close"></ion-icon></button>
       </ion-buttons>
   </ion-navbar>
</ion-header>

<ion-content>
   <ion-searchbar [formControl]="searchbar">
   </ion-searchbar>
   <ion-list>
       <ion-item *ngFor="let quote of quoteList">
           <ion-row>
             <h3>{{quote.symbol}}</h3>
           </ion-row>
           <ion-row center width-25>
             <p>{{quote.name}}</p>
           </ion-row>

           <button item-right danger (click)="watch(quote)">Watch</button>
       </ion-item>
   </ion-list>
</ion-content>
This should be self-explanatory.
Now open the “stock-detail.ts” and copy the following content:
stock-detail.ts
import {Component} from '@angular/core';
import {NavParams} from 'ionic-angular';
import {StockInfo} from '../../providers/stock-info';
import { SQLite } from 'ionic-native';

@Component({
   templateUrl: './stock-detail.html'
})
export class StockDetail {
    // Details info
    public db: SQLite;

   month:number = 1;
   details:{};
   quote:any;
   data:any;
   constructor(params: NavParams, public stockinfo:StockInfo) {
        this.db = new SQLite();
       this.quote = params.get('quote');
        console.log("Detail Quote: " + this.quote);
       this.getChartData();
   }

   getChartData() {
           this.stockinfo.getChart(this.quote.symbol, this.month)
           .subscribe(data=> {
           let newData:any = {};
           newData.series = [];
           newData.series.push({meta: 'Low', name: 'Low', data:[]});
           newData.series.push({meta: 'Close',name: 'Close', data:[]});
           data.forEach(day=> {
               newData.series[0].data.unshift(Number.parseFloat(day.Low));
               newData.series[1].data.unshift(Number.parseFloat(day.Close));
           });
               this.data = newData;
           });
   }
}
This is our details page of the stocks which is used when we will be opening a particular stock to see its information.
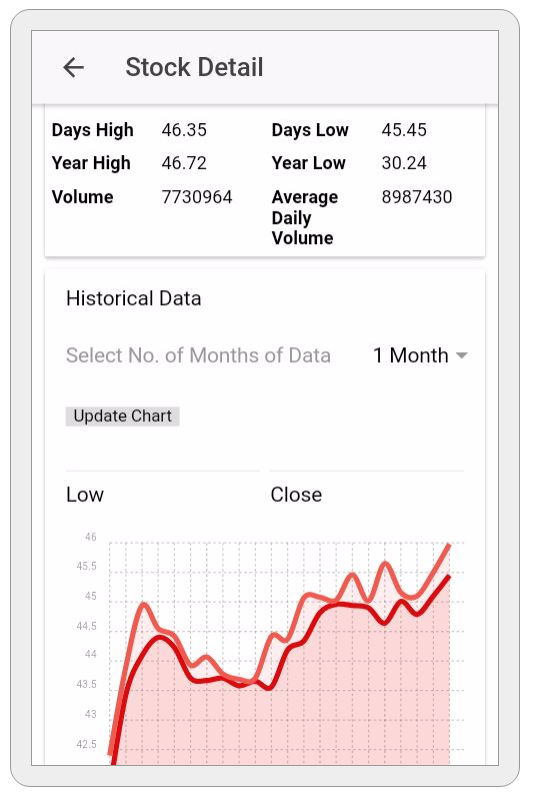
Now, open the “stock-detail.html” and copy the following code:
stock-detail.html
<ion-header>
   <ion-navbar>
       <ion-title>Stock Detail</ion-title>
   </ion-navbar>
</ion-header>

<ion-content class="detail">
   <ion-card>
       <ion-list>
           <stock [info]="quote" sliding="false"></stock>
       </ion-list>
   </ion-card>

    <stock-detail [symbol]="quote.symbol"></stock-detail>

   <ion-card>
       <ion-item>Historical Data</ion-item>
      <ion-list>
       <ion-item>
           <ion-label>Select No. of Months of Data</ion-label>
           <ion-select [(ngModel)]="month">
               <ion-option value=1>1 Month</ion-option>
               <ion-option value=3>3 Month</ion-option>
               <ion-option value=6>6 Month</ion-option>
               <ion-option value=12>12 Month</ion-option>
           </ion-select>
           </ion-item>
       </ion-list>
       <ion-item>
           <button (click)="getChartData()">Update Chart</button>
       </ion-item>
       <ion-item>
           <ion-label class="ct-series-a"><hr/>Low</ion-label>
           <ion-label class="ct-series-b"><hr/> Close</ion-label>
       </ion-item>
       <stock-chart class="ct-perfect-fourth" [data]="data"></stock-chart>
   </ion-card>

</ion-content>
Here, I have added the historical data along with the method to update the chart in real-time.
Now, in your “src/component” folder, create three new folders “stock”, “stock-chart” and “stock-detail”. Open the “stock/” folder, create a new file “stock.ts” and copy the following content:
stock.ts
import {Component, Input, Output, OnChanges, OnInit, OnDestroy, EventEmitter} from '@angular/core';
import {ViewController, Events} from 'ionic-angular';
import {Http} from '@angular/http';
import {StockInfo} from '../../providers/stock-info';

import {Subscription} from 'rxjs/Rx';

import { Platform } from 'ionic-angular';

@Component({
   selector: 'stock',
   templateUrl: './stock.html'
})

export class StockCmp {
    // Our inputs
    // Sliding options
   @Input() sliding;
   @Input() info;
   @Input() run;
   @Output() delete =  new EventEmitter();
   data = {};
   down:Boolean;
   loading:Boolean;
   symbolStock:any;
   subscription:Subscription;

   constructor(public http:Http, public ss:StockInfo, public vc: ViewController, public events:Events, public platform: Platform) {

        this.platform.ready().then(() => {
        this.loading = true;
          this.sliding = (this.sliding === "true");
          console.log("Info Stock: " + this.info);

          //if (this.info != null) {
              this.symbolStock = this.ss.getPriceInfo(this.info.symbol);
              this.subscription =  this.symbolStock.subscribe(data => {
                  this.data = data;
                  this.loading = false;
              });
          //}
        });
   }

   percentageSign(value) {
       if(value === undefined || value === null) {
           return 'number';
       } else if(value[0] ==="-") {
          this.down = true;
          return 'percentage_neg'
       } else {
           this.down = false;
           return 'percentage_pos';
       }
   }

   ngOnChanges() {
       if(this.run) {
          if(this.symbolStock && this.subscription) {
               this.subscription =  this.symbolStock.subscribe(data => {
                   this.data = data;
                   this.loading = false;
               });
          }
       } else {
          if(this.subscription) {
            this.subscription.unsubscribe();
          }
       }
   }

   deleteItem() {
       this.delete.emit("delete");
   }
}
This component is for actually computing the stock. Here, we are defining several @Input variables that we used earlier in our previous pages. If you are not familiar with @Input then know that it is used for transferring values between components, so “info” is set to “stock”, while the “sliding” is for checking whether the list is “slideable” or not for putting the “delete” button on it.
In the same folder, create a new file “stock.html” and copy the following code:
stock.html
<ion-item-sliding>
 <a ion-item text-wrap class="stockcmp">
     <ion-row>
       <h3>{{info.symbol}}</h3>
     </ion-row>
     <ion-row center width-25>
       <p>{{info.name}}</p>
     </ion-row>

     <ion-spinner item-left *ngIf="loading"></ion-spinner>
     <span item-right *ngIf="!loading">
       <span>{{data.LastTradePriceOnly | numberString}}</span>
       <ion-note class="price" [ngClass]="percentageSign(data.Change)">{{data.Change | numberString}}%</ion-note>
       <ion-icon *ngIf="!down" name="arrow-up"></ion-icon>
       <ion-icon *ngIf="down" name="arrow-down"></ion-icon>
     </span>
 </a>

 <ion-item-options *ngIf="sliding">
       <button primary (click)="deleteItem()">
         <ion-icon name="delete"></ion-icon>
         Delete
       </button>
 </ion-item-options>
</ion-item-sliding>
This should shouldn’t be hard to understand. Oh, we are using “numberString” pipe here that we will add soon. This component is for printing the stock information in simple formats.
In the same class, create “stock.scss” and copy the following code:
stock.scss
.stockcmp {
   .number {
     padding:10px 20px;
     text-align: center;
     min-width: 120px;
     max-width:120px;
     border-radius:3px;
   };

   .percentage_pos {
       @extend .number;
       background: mediumseagreen;
       color:white;
   };

   .percentage_neg {
      @extend .number;
      background: indianred;
      color:white;
   }
}
This is just for styling and nothing else. In the same folder, create a new file “pipe.ts” and copy the following code:
pipe.ts
import {Pipe} from '@angular/core';
@Pipe({
   name: 'numberString'
})
export class NumberStringPipe {
   transform(val, args) {
       return Number.parseFloat(val).toFixed(3);
   }
}
This is a very simple pipe that translates the number to a string.
Now, in your “component/stock-chart” folder, create a new file “stock-chart.ts” and copy the following code:
stock-chart.ts
import {Component, Input, Output, ViewChild, ElementRef, OnChanges} from '@angular/core';
declare var Chartist;

@Component({
   selector: 'stock-chart',
   template: ``
})
export class StockChart {
    // We are using Chartist for rendering charts
   @Input() data:{};
   constructor(public elm: ElementRef) {}

   ngOnChanges() {
       if(this.data) {
           let options = {
               showPoint: false,
               axisX: {
                   showGrid: true,
                   showLabel:true
               },
               showArea:true,
               chartPadding: {
                   top: 15,
                   bottom: 5,
                   left: 10
               }
           };
           let chart = new Chartist.Line(this.elm.nativeElement,this.data, options);
       }
   }
}
Here, we are defining the options for our Chartist.js library.
Now, in the “component/stock-detail” folder, create a new file “stock-detail.ts” and copy the following code:
stock-detail.ts
import {Component, Input, OnInit} from '@angular/core';
import {StockInfo} from '../../providers/stock-info';
import { Platform } from 'ionic-angular';

@Component({
   selector: 'stock-detail',
   templateUrl: './stock-detail.html',
})

export class StockDetailCmp {
   @Input() symbol;
   detail = {};
   constructor(public stockInfo: StockInfo, public platform: Platform) {
        this.platform.ready().then(() => {

        });
   }

   ngOnInit() {
       this.stockInfo.getDetail(this.symbol)
       .subscribe(data => {
           this.detail = data;
       });
   }

}
This code shouldn’t be hard to understand. Here, we are getting the details of stock and that will be shown in the HTML side.
Now, create a new file “stock-detail.html” and copy the following code:
stock-detail.html
<ion-card class="stock-detail-cmp">
   <ion-item>Detail</ion-item>
   <ion-row text-wrap>
       <ion-col>Stock Exchange</ion-col>
       <ion-col>{{detail.StockExchange}}</ion-col>
       <ion-col>Currency</ion-col>
       <ion-col>{{detail.Currency}}</ion-col>
   </ion-row>
   <ion-row text-wrap>
       <ion-col>Ask</ion-col>
       <ion-col>{{detail.Ask}}</ion-col>
       <ion-col>Bid</ion-col>
       <ion-col>{{detail.Bid}}</ion-col>
   </ion-row>
   <ion-row text-wrap>
       <ion-col>Days High</ion-col>
       <ion-col>{{detail.DaysHigh}}</ion-col>
       <ion-col>Days Low</ion-col>
       <ion-col>{{detail.DaysLow}}</ion-col>
   </ion-row>
   <ion-row text-wrap>
       <ion-col>Year High</ion-col>
       <ion-col>{{detail.YearHigh}}</ion-col>
       <ion-col>Year Low</ion-col>
       <ion-col>{{detail.YearLow}}</ion-col>
   </ion-row>
   <ion-row text-wrap>
       <ion-col>Volume</ion-col>
       <ion-col>{{detail.Volume}}</ion-col>
       <ion-col>Average Daily Volume</ion-col>
       <ion-col>{{detail.AverageDailyVolume}}</ion-col>
   </ion-row>
</ion-card>
You can see that I am using “class="stock-detail-cmp"” which we will define soon.
In the same folder, create a new file “stock-detail.scss” and copy the following content:
stock-detail.scss
.stock-detail-cmp {
   ion-col:nth-child(2n-1) {
       font-weight: bold;
   }
}
Make sure all these components and pages are included in “app.module.ts” (including the ‘NumberStringPipe’). In “app.component.ts” you only need to add the “StockList” page.
You can do “ionic serve” to see the cool result.
If you have trouble following the code, then you can visit the Github repository (https://github.com/danyalzia/ionic2-charts-play).
Conclusion
So, as you can see it’s not really difficult to integrate the charts, at least when it comes to logic and development in TypeScript and Ionic 2. However, it takes some effort to add and manipulate all those pages and components together to form a new creation. Thankfully, Ionic 2’s modular approach makes the tasks incredibly easier and less cumbersome.
If you have any questions, then please ask in the comment section below and check out the homepage to find countless SDK tools.
Recent Stories


Top DiscoverSDK Experts


Featured Products


Compare Products
Select up to three two products to compare by clicking on the compare icon () of each product.
{{compareToolModel.Error}}
{{CommentsModel.TotalCount}} Comments
Your Comment