
Using Magic Email Links To Authenticate Users With Firebase 5.7.0 In Angular 7.1.2
The other week, I was talking to Chesley Brown - one of our lead software engineers at InVision - about adding even more security to the Incident Commander app. Right now, Incident Commander uses a large amount of random data (in conjunction with some Firebase security rules) to create "security through obscurity". But, since Incident Commander is also powered by Firebase, we thought that adding some Firebase authentication could be an easy next step. I've never used Firebase's authentication model before; but, I have used and love Auth0's "passwordless authentication" workflows. As such, I wanted to experiment with one of Firebase's passwordless authentication techniques, which sends out a magic email link that will automatically log the user into my Angular 7.1.2 application (using the Firebase client library).
Run this demo in my JavaScript Demos project on GitHub.
View this code in my JavaScript Demos project on GitHub.
To be clear, in this demo, I'm not really adding any additional information on top of what is already available in the Firebase tutorial on email link authentication. My goal here is simply to translate that workflow into an Angular and TypeScript context such that I can build up my mental model of how Firebase authentication can work in a client-side-only application.
With that said, email link / passwordless authentication with Firebase has three essential steps (if you don't include configuring your app in the Firebase console):
Step 1: User provides email address for authentication. The Angular app asks Firebase to send the magic email link to said email address with a redirect URL that points back to our Angular app.
Step 2: User clicks on email link in mail client (ex, Gmail). This will take the user back to our Angular app using a special set of Firebase-provided URL parameters.
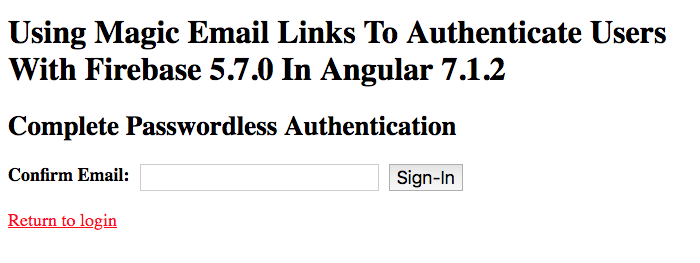
Step 3: User confirms email address in Angular app. Firebase will create the user entry (if necessary) and start a new Firebase user session. In order to prevent session fixation attacks, Firebase requires that the email address be re-provided as a challenge to the authentication request. Note that this step can be processes implicitly if we store the user's email address in a locally-persisted storage location.
To be honest, the code used to send the email link and process the subsequent authentication is straightforward - it's just method calls on the Firebase SDK (Software Developer Kit). The real challenging part of this demo was trying to figure out how to integrate it into an Angular application without having to add a lot of complexity, like Routing and RxJS Streams.
Now, to be clear, a "production" Angular app would almost certainly be structured with routes and services and RxJS streams. But, for the sake of simplicity, I ended up just using a "view" variable to define which step of the authentication workflow I was currently showing the user. These steps are then managed in my App component's template using a single NgSwitch statement.
The following template code can be read from top-to-bottom, where each NgSwitchCase represents the next phase of magic email link / passwordless authentication:
<!--
	For the sake of simplicity, we are going to keep this demo as SIMPLE AS POSSIBLE.
	Each phase of the passwordless / magic email link authentication workflow will be
	modeled by one of the following "views".
-->
<div [ngSwitch]="view">

	<!--
		PHASE ONE: Status Unknown - after we initialize the Firebase client instance, we
		don't know the user's authentication status right away. The status is reported
		asynchronously. As such, we want to represent the app as "loading" until will,
		at the very least, know whether or not the user is logged-in.
	-->
	<div *ngSwitchCase="( 'loading' )">

		<p>
			<em>Loading....</em>
		</p>

	</div>

	<!--
		PHASE TWO: Not Logged-In - once we know that the user does not have a Firebase
		user session, we can present them with a login form. Since we are using the magic
		email link / passwordless authentication, the user only needs to provide their
		email address, to which we will send a one-time-use magic email link.
	-->
	<div *ngSwitchCase="( 'login' )">

		<h2>
			Login With Magic Email Link
		</h2>

		<div *ngIf="errorMessage" class="error">
			{{ errorMessage }}
		</div>

		<form (submit)="sendMagicLink( emailInput.value.trim() ); $event.preventDefault()">
			<strong>Email:</strong>
			<input #emailInput type="text" size="25" />
			<button type="submit">Send Magic Email Link</button>
		</form>

	</div>

	<!--
		PHASE TWO (continued): Email Link Sent - once the magic email link has been sent,
		the user will need to go do their email client (ex, Gmail) and either click on
		the link we sent her; or, copy-paste the link back into this browser.
	-->
	<div *ngSwitchCase="( 'sent' )">

		<h2>
			Login With Magic Email Link
		</h2>

		<p>
			<strong>We've sent you an email</strong> - in order to complete your login,
			please click on the link in the email; or, copy-paste it back into this
			browser navigation bar.
		</p>

		<p>
			<a (click)="setView( 'login' )">Return to login</a>
		</p>

	</div>

	<!--
		PHASE THREE: Pending Authentication - Firebase has sent out the one-time-use
		magic email link for passwordless authentication. The user now needs to confirm
		the email address associated with the link (as a security precaution to prevent
		session fixation attacks).
		// --
		NOTE: If we store the user's email address in something like LocalStorage, then
		we can implicitly process this step without asking the user to do anything.
	-->
	<div *ngSwitchCase="( 'authenticate' )">

		<h2>
			Complete Passwordless Authentication
		</h2>

		<div *ngIf="errorMessage" class="error">
			{{ errorMessage }}
		</div>

		<form (submit)="authenticate( emailInput.value.trim() ); $event.preventDefault()">
			<strong>Confirm Email:</strong>
			<input #emailInput type="text" size="25" />
			<button type="submit">Sign-In</button>
		</form>

		<p>
			<a (click)="setView( 'login' )">Return to login</a>
		</p>

	</div>

	<!--
		PHASE FOUR: Authenticated User - once the user confirms their email address, we
		are able to process the email-link URL. This will result in a Firebase use
		session. This session is long-lived by default (but can be adjusted); which makes
		it important to provide an explicit sign-out call-to-action.
	-->
	<div *ngSwitchCase="( 'home' )">

		<h2>
			Welcome <code>{{ user.email }}</code>.
		</h2>

		<p>
			What a glorious day to be using Angular 7 and Firebase!
		</p>

		<p>
			<a (click)="signout()">Sign-Out</a>
		</p>

	</div>

</div>
As you can see, the sections of this template, driven by the "view" property, line-up with the authentication steps outlined above: first, the user provides their email address; then, they confirm their email address (after clicking the email link); then, they are logged into the Angular 7.1.2 application.
Notice, however, that the first template section is for "loading". Since the user's session is completely controlled by Firebase, we don't have a synchronous way to see if a user is logged-in at the time our Angular application is bootstrapped. As such, we have to put the application into a loading state before Firebase reports the user's status to us.
Once Firebase reports the user's authentication status (using the onAuthStateChanged() callback), we can either render the "login" view if the user is not authenticated; or, we can render the "home" view if the user has already authenticated during a previous execution of the application life-cycle.
With that said, let's look at the component code that drives this Angular template. In the following component, pay close attention to the .ngOnInit(), .sendMagicLink(), and .authenticate() methods as these more-or-less layout the steps that were outlined in the component template:
// Import the core angular services.
import { Component } from "@angular/core";
import firebase = require( "firebase/app" );
import { OnInit } from "@angular/core";

// Import these libraries for their side-effects.
// --
// NOTE: These libraries augment the firebase module. If you don't include the following
// module, for example, then the "firebase.auth()" method won't be available.
import "firebase/auth";

// ----------------------------------------------------------------------------------- //
// ----------------------------------------------------------------------------------- //

interface User {
	id: string;
	email: string;
}

type View = "loading" | "login" | "sent" | "authenticate" | "home";

@Component({
	selector: "my-app",
	styleUrls: [ "./app.component.less" ],
	templateUrl: "./app.component.htm"
})
export class AppComponent implements OnInit {

	public errorMessage: string | null;
	public user: User | null;
	public view: View;

	// I initialize the app component.
	constructor() {

		this.errorMessage = null;
		this.user = null;
		this.view = "loading";

	}

	// ---
	// PUBLIC METHODS.
	// ---

	// I complete the magic email link authentication workflow, signing the user with the
	// given email into a Firebase user session.
	public authenticate( email: string ) : void {

		firebase.auth()
			// NOTE: Firebase web sessions are long-lived by default (and required an
			// explicit sign-out). If you want to control the persistence approach for
			// the session, you have to explicitly tell Firebase what to do.
			// --
			// READ MORE: https://firebase.google.com/docs/auth/web/auth-state-persistence
			.signInWithEmailLink( email, window.location.href )
			.then(
				( result: firebase.auth.UserCredential ) => {

					// NOTE: Since the user is Typed as being optional, we have to check
					// for it or TypeScript will complain.
					if ( result.user && result.user.uid && result.user.email ) {

						this.view = "home";
						this.errorMessage = null;
						this.user = {
							id: result.user.uid,
							email: result.user.email
						};

						// At this point, the user has fully authenticated; but, the
						// magic email link is still represented in the browser URL.
						// As such, if the user were to refresh the browser, it would
						// take them back to this page (with an invalid token). To help
						// prevent this edge-case, let's redirect the user back to the
						// root of the application such that a refresh would be safe.
						// --
						// NOTE: We can't use the Location service for this because it
						// can only handle in-app URLs and the Firebase URI components
						// may extend outside of our app context (depending on our
						// Angular location strategy).
						if ( window.history.replaceState ) {

							window.history.replaceState( null, "", this.getAppRootUrl() );

						} else {

							window.location.href = this.getAppRootUrl();

						}

					} else {

						this.errorMessage = "Something unexpected happened";

					}

				},
				( error: any ) => {

					console.warn( "Authentication failed" );
					console.error( error );

					switch ( error.code || "" ) {
						case "auth/expired-action-code":
						case "auth/invalid-action-code":
						case "auth/invalid-email":
						case "auth/user-disabled":
							this.errorMessage = error.message;
						break;
						default:
							this.errorMessage = "Something unexpected happened";
						break;
					}

				}
			)
		;

	}


	// I get called once after the input bindings have been checked for the first time.
	public ngOnInit() : void {

		// Configure our Firebase instance.
		firebase.initializeApp({
			apiKey: "AIzaSyBvifzQI6GNzQIVf-2IOTeDYS3oj6i5p1Y",
			authDomain: "fir-auth-demo-eb4d9.firebaseapp.com",
			databaseURL: "https://fir-auth-demo-eb4d9.firebaseio.com",
			projectId: "fir-auth-demo-eb4d9",
			storageBucket: "fir-auth-demo-eb4d9.appspot.com",
			messagingSenderId: "426562040801"
		});

		// After we initialize Firebase, we want to leave the app in a loading state
		// until we know whether the current user is logged-in or logged-out. The user
		// state is managed internally by Firebase and is not available right away.
		var stopListening = firebase.auth().onAuthStateChanged(
			( user: firebase.User ) => {

				// For the sake of this demo, we only care about the authentication state
				// change on the initial load. For all other actions, we will be able to
				// determine user status based on the contextual promises.
				stopListening();

				// NOTE: The uid and email fields are both marked as optional; as such,
				// we have to check for their existence or TypeScript will complain.
				if ( user && user.uid && user.email ) {

					this.user = {
						id: user.uid,
						email: user.email
					}

				}

				// If the current request denotes an authentication URL, then that will
				// take precedence over other rendering options.
				// --
				// NOTE: If we had stored the email in a persistent storage like
				// localStorage, then we could handle this workflow automatically.
				// However, in order to keep the demo as simple as possible (and to make
				// it easier to test different error conditions), I'm going to have the
				// user explicitly confirm their email address.
				if ( firebase.auth().isSignInWithEmailLink( window.location.href ) ) {

					this.view = "authenticate";

				} else {

					this.view = ( this.user )
						? "home"
						: "login"
					;

				}

			}
		);

	}


	// I send the magic email link that allows the user to log into the application using
	// just an email address (ie, passwordless login).
	public sendMagicLink( email: string ) : void {

		// When we send out the magic email link, we have to provide a fully-qualified
		// public URL that Firebase can redirect the user back to at the end of the link
		// consumption. For the purposes of this demo, this URL will just be the root of
		// the demo application.
		// --
		// NOTE: If you wanted to include "state" in the email workflow, you can could
		// provide a URL that contains route-parameters or query-string values.
		firebase.auth()
			.sendSignInLinkToEmail(
				email,
				{
					url: this.getAppRootUrl(),
					handleCodeInApp: true
				}
			)
			.then(
				( response ) => {

					this.view = "sent";
					this.errorMessage = null;

				},
				( error: any ) => {

					console.warn( "ERROR:" );
					console.error( error );

					switch ( error.code || "" ) {
						case "auth/argument-error":
						case "auth/invalid-email":
						case "auth/missing-android-pkg-name":
						case "auth/missing-continue-uri":
						case "auth/missing-ios-bundle-id":
						case "auth/invalid-continue-uri":
						case "auth/unauthorized-continue-uri":
						case "auth/invalid-dynamic-link-domain":
							this.errorMessage = error.message;
						break;
						default:
							this.errorMessage = "Something unexpected happened";
						break;
					}

				}
			)
		;

	}


	// I switch to the given view.
	public setView( view: View ) : void {

		this.view = view;
		this.errorMessage = null;

	}


	// I sign the user out of the current Firebase user session.
	public signout() : void {

		// NOTE: Firebase web-based user session are long-lived by default. If you want
		// to sign-out, you have to do so explicitly with an API call.
		firebase.auth().signOut().then(
			() => {

				this.view = "login";
				this.errorMessage = null;

			},
			( error: any ) => {

				console.warn( "Sign-out failure." );
				console.error( error );

				this.errorMessage = "Something unexpected happened.";

			}
		);

	}

	// ---
	// PRIVATE METHODS.
	// ---

	// I return the URL context for the ingress into the application. This will act as
	// the prefix for external URLs as well as the root of the application that we can
	// redirect to once authentication has been completed.
	private getAppRootUrl() : string {

		// Since the demo may be running locally or on GitHub; and, using the Hash or
		// Path location strategy; we need to calculate the the ingress using the the
		// name of the demo folder that we know we're in.
		var folder = "/firebase-email-auth-angular7/";

		// Find the index of this folder in the browser URL.
		var folderIndex = window.location.href.indexOf( folder );

		// Return the URL prefix up-to and including the demo folder. This will be the
		// base off of which we append all internal app-URLs.
		return( window.location.href.slice( 0, ( folderIndex + folder.length ) ) );

	}

}
As you can see, each of the Angular component methods is essentially a proxy to some underlying firebase.auth() call that adds additional error and result handling for the application.
The one thing that doesn't really sit well with me is the fact that I had to rely on the "window.location" object. Both when asking Firebase if the current URL was an "authentication URL"; and, when trying to calculate the fully qualified public URL of the application (for the authentication redirect). I tried poking around in the Location service; but, I couldn't find a method that would maintain the browser location as a clean abstraction - the Location service only seems to concern itself the "app local" route. As such, in this demo, I had to calculate the public URL using the folder-name that I knew the demo would live in.
NOTE: For Angular apps that have a server-side component, I've provided the "App URL" as a configuration data-point during the application bootstrapping. That way, the app never needs to guess as to where it is coming from - it only needs to append app-local routes to the app-url value.
With that said, if I load this application and enter my email address as the login value, I get the following email from Firebase:
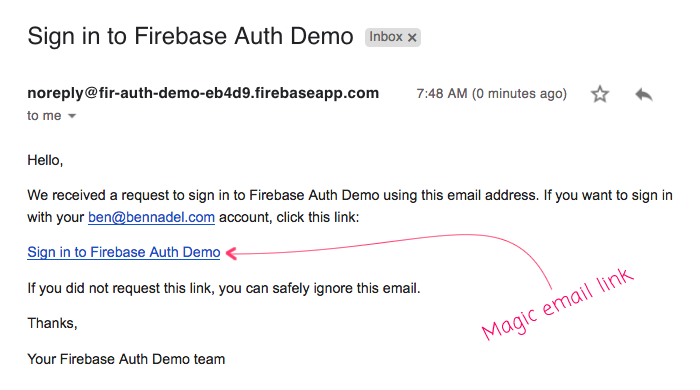
If I then click the magic email link, I'm taken back to my Angular application. And, when the Angular application loads, I use Firebase to assert that the current URL is a "sign-in with email link" URL at which point I get prompted to confirm my email:
And, once I confirm my email address, the Firebase client SDK calls back to the Firebase server and creates a new, authenticated user session:
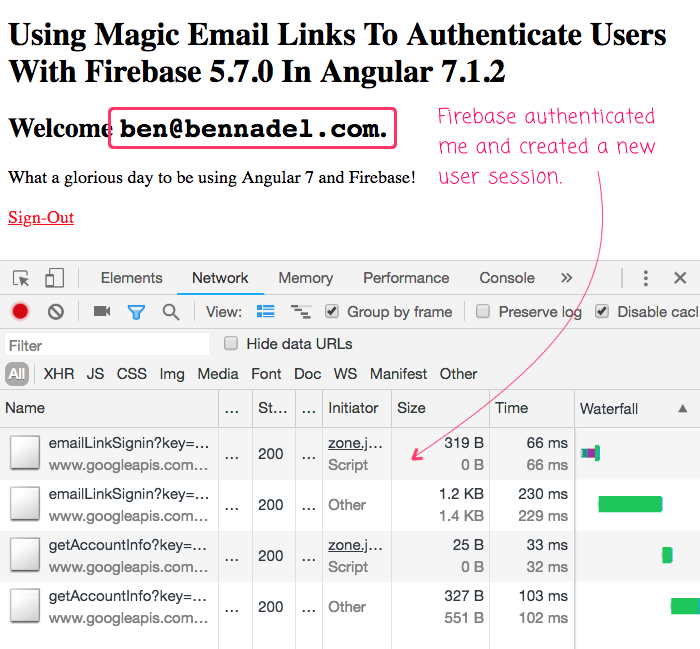
At this point, the .onAuthStateChanged() callback would have been invoked (had I not unsubscribed from it). But, since each Firebase API call returns a promise, I already know from the current request that I'm authenticated and I have a reference to the user object.
Historically, I've used Firebase for its real-time database capabilities. But, with "Backend-as-a-Service" (BaaS) features like user management and passwordless authentication, you can really get a sense of how much power is available. And, how much Firebase lowers the barrier-to-entry when it comes to creating JAM-Stack (JavaScript, APIs, and Markup) applications with Angular. This is definitely something I'll be digging into more.
Want to use code from this post? Check out the license.
Reader Comments
Hello, I'm using ReacJS, I'm also testing the Email link for authentication. I can even do the cycle generate emails, do the link authentication and log in. What I can not understand is: how to re-authenticate this user again, without having to send a new link, there are even two functions for this: Link and Re-Authenticate, but I can not understand? Another question I have is this, if this user had your cell phone stolen, would he have to authenticate another cell phone or any computer? Another question is, I usually authenticated, I activated the link, I went in and out a few times everything ok !!! Now let's suppose that I go to a friend's house, use this friend's computer or cell phone to authenticate, would it be possible? even if it generates another email link to authenticate on this computer, as it would later be so that this friend does not authenticate using my email.
Thanks a lot! You save of a real pain :D
@Miguel,
Awesome, glad this was helpful!
@Alexon,
I am sorry, this was my first look at Firebase's email-based authentication, so I am not really able to speak confidently about your questions. That said, my assumption would be that Firebase is storing something like a JWT (JSON Web Token) in your browser to represent the authenticated session. As such, if you go to another browser or computer, it is very likely that you would have to re-authenticate for that browser.
really great
facing issue while using :
var actionCodeSettings = {
// url: 'localhost',
// handleCodeInApp: true,
// // iOS: {
// // bundleId: 'com.example.ios'
// // },
// // android: {
// // packageName: 'com.example.android',
// // installApp: true,
// // minimumVersion: '12'
// // },
// dynamicLinkDomain: 'http://localhost:4200/#/home/settings'
// };
================= very easy ======================
private getAppRootUrl() : string {
}
sendMagicLink(){
console.log("Send magic link calling")
this.afAuth.sendSignInLinkToEmail('Email ID', {
url: this.getAppRootUrl(),
handleCodeInApp: true
})
.then(function() {
console.log("success")
window.localStorage.setItem('emailForSignIn', 'Email Id');
})
.catch(function(error) {
console.log(error)
});
}