Sponsors


Connecting React Components the DOM
Last time, we learned about the lifecycle of React components—a collection of methods that are called during the life of a React component. In this article, we’ll learn all about connecting React components to DOM elements i.e. regular HTML elements like input. You may ask why we’d need regular elements at all. Well, at the end of the day, at the base of any component there is a UI element that we need to connect to.
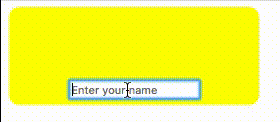
Let’s explore this with a real-world example. Imagine there’s a component where I can enter a name and all it does is display it. It’s nothing to go crazy over, and at this point of the series you should absolutely be able to understand this code:
class NameDisplay extends React.Component {
 constructor(props, context) {
   super(props, context);
   this.state = {
     name: ''
   };
   this.nameValue = this.nameValue.bind(this);
 }
 nameValue(e) {
   this.setState({ name: e.target.value });
 }
 render() {
   const bigStyle = {
     backgroundColor: 'yellow',
     borderRadius: 10,
     color: 'silver',
     fontSize: '42px',
     minHeight: '30px',
     textAlign: 'center',
     width: '250px',
   };
   return <div style={bigStyle}>
       {this.state.name}
      <form>
        <input onChange={this.nameValue} placeholder="Enter your name"></input>
      </form>
     </div>
 }
}

const target = document.getElementById('content');
ReactDOM.render(
 <NameDisplay />,
 target
);
Pretty straightforward, but let’s go over it anyway just to be sure we’re all on the same page here. I have an input with the event onChange. When I type something into the input field, the onChange calls nameValue which takes whatever is in the input element and then puts it into this.state.name which is displayed in the JSX. As such, whatever I type into the textbox appears on the screen. And don’t forget to put into the constructor:
this.nameValue = this.nameValue.bind(this);
This lets the nameValue function have access to our this, despite that it’s activated by onChange.
OK, that’s all well and good. But then imagine that out of nowhere, your nasty project manager comes along and says that it’s not really working for them. Why? They don’t want the name to appear when someone types. They want the name to appear only after you press a ‘submit’ button. And why is that? “Because it doesn’t look good when there’s only half a name on the screen—it’ll confuse the customer.” SMH.
So after beating said project manager with a rolled up newspaper, you’re pretty much going to have to do what they want. Luckily it’s pretty easy. The display will be that of a different state variable (e.g. displayName) and we’ll add a submit button that will make that value go into nameValue to be displayed.
class NameDisplay extends React.Component {
 constructor(props, context) {
   super(props, context);
   this.state = {
     name: '',
     displayName: ''
   };
   this.nameValue = this.nameValue.bind(this);
   this.setdisplayName = this.setdisplayName.bind(this);
 }
 nameValue(e) {
   this.setState({ name: e.target.value });
 }
 setdisplayName() {
   this.setState({ displayName: this.state.name });
 }
 render() {
   const bigStyle = {
     backgroundColor: 'yellow',
     borderRadius: 10,
     color: 'silver',
     fontSize: '42px',
     minHeight: '30px',
     textAlign: 'center',
     width: '250px',
   };
   return <div style={bigStyle}>
       {this.state.displayName}
      <form>
        <input onChange={this.nameValue} placeholder="Enter your name"></input>
        <button type="button" onClick={this.setdisplayName}>Submit</button>
      </form>
     </div>
 }
}

const target = document.getElementById('content');
ReactDOM.render(
 <NameDisplay />,
 target
);
Here’s what I did, step by step:
- Create the nameValue state
- Create setDisplayName that takes the this.state.name and put it into displayName
- Don’t forget to do bind on the constructor to setDisplayName
- Create a button with type=button where each click will call setDisplayName
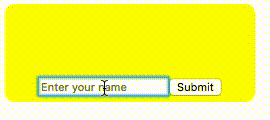
And now to the point of this whole thing. Our beloved project manager comes to us again and says that they want the input to be cleared after submit is pressed. Now, after a few smacks with a riding crop (‘cause the newspaper isn’t gonna do it this time), the question arises, how can we do this? This is exactly a case where I need to be able to connect to the input in a way that allows me to call it. This we’ll do using ref, which is a JSX property that allows us to connect an element to a variable in class to which I can easily connect. It’s done like so:
ref={(el) => { this._input = el; }}
Then I can easily use this._input in my code. In this case, I can clean in and use focus on it. Yes, it’s really that easy. Have a look at the code and at the live example:
class NameDisplay extends React.Component {
 constructor(props, context) {
   super(props, context);
   this.state = {
     name: '',
     displayName: ''
   };
   this.nameValue = this.nameValue.bind(this);
   this.setDisplayName = this.setDisplayName.bind(this);
 }
 nameValue(e) {
   this.setState({ name: e.target.value });
 }
 setDisplayName() {
   this.setState({ displayName: this.state.name });
   this._input.focus();
   this._input.value = '';
 }
 render() {
   const bigStyle = {
     backgroundColor: 'yellow',
     borderRadius: 10,
     color: 'silver',
     fontSize: '42px',
     minHeight: '30px',
     textAlign: 'center',
     width: '250px',
   };
   return <div style={bigStyle}>
       {this.state.displayName}
      <form>
        <input onChange={this.nameValue} ref={(el) => { this._input = el; }} placeholder="Enter your name"></input>
        <button type="button" onClick={this.setDisplayName}>Submit</button>
      </form>
     </div>
 }
}

const target = document.getElementById('content');
ReactDOM.render(
 <NameDisplay />,
 target
);
Nice and simple, and really useful. We should note that at the base of all of the components in your project, there will be input and other elements that you’ll need to connect to. This is how you do it.
Next time, we’ll talk about a real development environment for React. If you’re not familiar with Babel, now is the time to check out our series on it to get up to speed. Till next time.
| Previous Article: React Lifecycle | Next article: React Environment Setup |
About the author: Ran Bar-Zik is an experienced web developer whose personal blog, Internet Israel, features articles and guides on Node.js, MongoDB, Git, SASS, jQuery, HTML 5, MySQL, and more. Translation of the original article by Aaron Raizen.
Recent Stories


Top DiscoverSDK Experts


Featured Products


Compare Products
Select up to three two products to compare by clicking on the compare icon () of each product.
{{compareToolModel.Error}}
{{CommentsModel.TotalCount}} Comments
Your Comment