
Today I'm going to briefly introduce a simple workflow for automating testing that uses Mocha and Chai. Mocha is a test framework that sets up test suites, and Chai is an expectation framework that adds helpers to make it easier to build tests against code.
But why do I need to do this??
Writing solid tests saves a developer the hassle of clicking around in an app to manually test every single feature of the application. It's also important when utilizing Test Driven Development, or TDD. While I'm not going to fully dive into TDD here, it basically is a style of development in which:
- Tests are written first. Only write enough of a test to fail.
- Production code is then written with the express purpose of making a failing unit test pass.
So let's get started by installing Mocha and Chai
▶︎ Chai installation instructions
▶︎ Mocha installation instructions
Once we have these installed, we have two ways in which to run our tests: through our console with Node, or in the browser. Using the browser method requires creating a special html file, which we will get into in a bit. But first:
Testing in Node
Say we were building an addition function that needed to be able to add either an array of numbers or two numbers passed in as parameters. Let's use an npm init to create a package.json file.
Next we need to add chai and mocha to our dev-dependencies, and for convenience sake, add a script for running mocha. My package.json for this exercise looks like this:
{
  "name": "mochachai-intro",
  "version": "1.0.0",
  "description": "",
  "main": "index.js",
  "scripts": {
    "test": "mocha"
  },
  "license": "ISC",
  "devDependencies": {
     "chai": "^4.2.0",
     "mocha": "^5.2.0"
  },
  "dependencies": {}
}
Now we can do an npm install to get all of our fun dependencies installed and get to work!
For the sake of this example, we're going to create two Javascript files, one called add.js and one called test.js. The test.js file is going to contain our tests that will be run against our add.js function.
Since we're utilizing TDD, let's come up with the tests first. Our test.js should look something like this:
const expect = require('chai').expect;
const add = require('./add.js');

describe('add', function() {
  it('should return the sum of two positive numbers', function() {
    expect(add(2, 4)).to.equal(6);
  });

  it('should return the sum of two negative numbers', function() {
    expect(add(-2, -4)).to.equal(-6);
  });

  it('should return the sum of an array of numbers', function() {
    expect(add([1,2,3,4,5])).to.equal(15);
  });
});
Now we just need to write a function that will do ONLY what is required by these test guidelines. Mine looks like this:
const add = function (num1, num2) {

  if (Array.isArray(num1)){
    let sum = 0;
    for ( let i = 0; i < num1.length; i++){
      sum += num1[i];
    }
    return sum;
  }

  return num1 + num2;
}

module.exports = add;
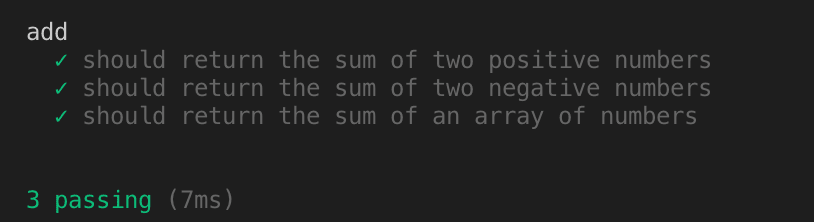
Now if we run npm test, we should get back a message that all of our tests are passing:
Testing in the Browser
If you decide that you want a fancy UI to show off your passing tests (and honestly who wouldn't), you simply have to add in an html page with some scripting for mocha and chai. I use a boilerplate test.html file that looks like this:
<!DOCTYPE html>
<html>
<head>
  <meta charset="utf-8">
  <title>Tests</title>
  <link rel="stylesheet" media="all" href="https://cdnjs.cloudflare.com/ajax/libs/mocha/5.2.0/mocha.css">
</head>
<body>
  <div id="mocha"><p><a href=".">Index</a></p></div>
  <div id="messages"></div>
  <div id="fixtures"></div>
  <script src="https://cdnjs.cloudflare.com/ajax/libs/mocha/5.2.0/mocha.js"></script>
  <script src="https://cdnjs.cloudflare.com/ajax/libs/chai/4.2.0/chai.min.js"></script>
  <script src="add.js"></script>
  <script>
    mocha.ui('bdd');
    mocha.reporter('html');
    const expect = chai.expect;
  </script>
  <script src="test.js"></script>
  <script>mocha.run();</script>
</body>
</html>
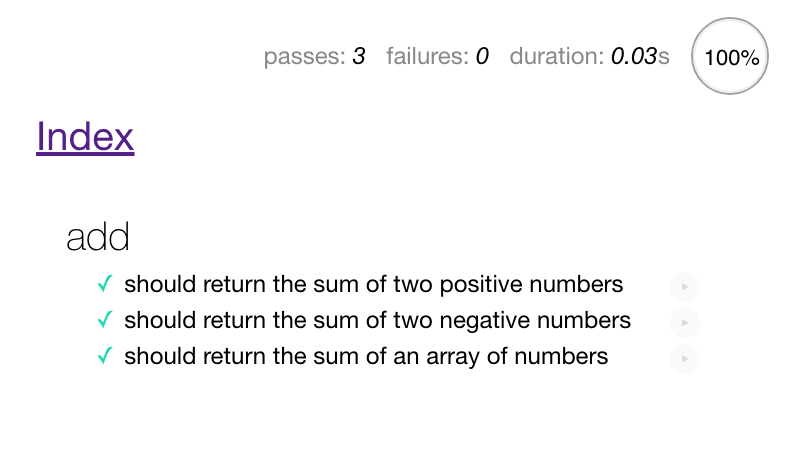
All we have to do is add this html page to our app and open it up in a browser and we should get a nice looking results page that even shows how long it's taking for our tests to run! The page for our add function should look like this:
Now what!?
Now we have a very basic idea of how to use Mocha and Chai to write tests, but what do we do with this information!? In Part 2, I will go into some more uses for testing that are more applicable to real-life scenarios.


Top comments (6)
you should NOT install mocha and chai as a DEPENDENCY, BUT as a DEV-DEPENDECY.
testing tools are dependencies for development, not for delivery.
Thanks for the heads up! I'll update the post and take that into account for the future
I think I need a coffee now
You speaking 'testing' === you receive new follower. :)
Thanks! Is that dependencies file 'package.json'?
Yup