![[ERR!]](https://pbs.twimg.com/profile_images/1119155620475596800/JzXLy_6x_normal.png)
Built android apps with JavaScript, HTML and CSS based on Node JS

In this tutorial we’ll learn about how to build a simple story Android App with Node JS using Android JS
What is Android JS?
Android JS is an open-source framework developed and maintained on GitHub. Android JS allows for the development of Android applications using front and back-end components originally developed for web applications: Node.js runtime for the backend and Android Webview for the frontend. Android JS framework can be used to android apps with frontend technologies like JavaScript, HTML, and CSS.
Assumptions & Requirements
Android JS requirements: Install NodeJS , npm and JDK 1.8 or above
Get these right now if they’re not installed on your computer.
I am assuming that you already have Node JS, npm and JDK ≥ 1.8 installed on your computer
So let’s start with Installation Part
Install Android JS project generator and builder
npm install -g androidjs-builder
Now let’s start building app
create a folder whatever name you want with, and where you want. In my case I am creating it on my desktop with name myapp
cd ~/desktop
mkdir myapp
let’s initiate NPM in our app
cd myapp
npm init
you’ll get directory structure something like this
myapp
|__package.json
let’s create some useful directories and files in our app
- we need a file named
main.jsin our app’s parent directory - and need one more file
index.htmlinsideviewsdirectory, it is the first view of our app which is gonna render by webview - and one more for storing
assetsof our app
touch main.js
mkdir views
mkdir assets
cd views
touch index.html
Now you’ll get directory structure something like this
myapp
|__views
|     |__index.html
|
|__assets
|
|__main.js
|__package.json
let’s install androidjs to our app
get back to app’s directory
cd ~/desktop
cd myapp
npm install androidjs
it’ll install androidjs and add it to the package.json as dependency of our app
download androidjs.js file and put it to assets folder and add it to the index.html
I am using simple HTML code to make the UI of our app like this :
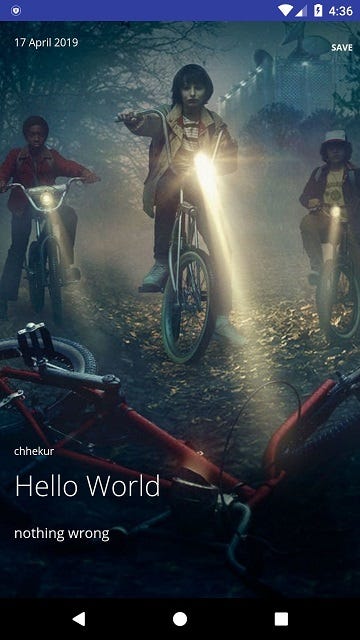
I already have HTML code for doing this
<html>
<head>
  <meta name="viewport" content="width=device-width, initial-scale=1.0">
  <!-- Add this androidjs.js file to your html file to get the functionality of android js -->
  <script type="text/javascript" src = "../assets/androidjs.js"></script>
</head>
<body>
<div class="example-2 card">
    <div class="wrapper">
      <div class="header">
        <div class="date">
          <span class="day">17</span>
          <span class="month">April</span>
          <span class="year">2019</span>
        </div>
        <ul class="menu-content">
          <li>
            <a href="#" class="fa fa-bookmark-o"></a>
          </li>
          <li><a href="#" class="fa fa-heart-o"><span onclick = "save();">SAVE</span></a></li>
        </ul>
      </div>
      <div class="data">
        <div class="content">
          <span class="author" id = "author" contenteditable="">Chhekur</span>
          <h1 class="title" id = "title" contenteditable="">Stranger Things: The sound of the Upside Down</h1>
          <p class="text" id = "text" contenteditable="">The antsy bingers of Netflix will eagerly anticipate the digital release of the Survive soundtrack, out today.</p>
        </div>
      </div>
    </div>
  </div>
</body>
<script>
</script>
<style>
@import url(https://fonts.googleapis.com/css?family=Open+Sans:300,400,700);
body{
margin: 0;
font-family: "Open Sans", sans-serif;
}
a {
text-decoration: none;
}
h1 {
font-family: "Open Sans", sans-serif;
font-weight: 300;
}
.row {
max-width: 900px;
margin: 50px auto 0;
}
.card {
/float: left;/
/padding: 0 1.7rem;/
width: 100%;
}
.card .menu-content {
margin: 0;
padding: 0;
list-style-type: none;
}
.card .menu-content::before, .card .menu-content::after {
content: '';
display: table;
}
.card .menu-content::after {
clear: both;
}
.card .menu-content li {
display: inline-block;
}
.card .menu-content a {
color: #fff;
}
.card .menu-content span {
position: absolute;
left: 50%;
top: 0;
font-size: 10px;
font-weight: 700;
font-family: 'Open Sans';
-webkit-transform: translate(-50%, 0);
transform: translate(-50%, 0);
}
.card .wrapper {
background-color: #fff;
min-height: 540px;
height: 100%;
position: relative;
overflow: hidden;
box-shadow: 0 19px 38px rgba(0, 0, 0, 0.3), 0 15px 12px rgba(0, 0, 0, 0.2);
}
.card .wrapper:hover .data {
-webkit-transform: translateY(0);
transform: translateY(0);
}
.card .data {
position: absolute;
bottom: 0;
width: 100%;
-webkit-transform: translateY(calc(70px + 1em));
transform: translateY(calc(70px + 1em));
transition: -webkit-transform 0.3s;
transition: transform 0.3s;
transition: transform 0.3s, -webkit-transform 0.3s;
}
.card .data .content {
padding: 1em;
position: relative;
z-index: 1;
}
.card .author {
font-size: 12px;
}
.card .title {
margin-top: 10px;
}
.card .text {
height: 70px;
margin: 0;
}
.card input[type='checkbox'] {
display: none;
}
.card input[type='checkbox']:checked + .menu-content {
-webkit-transform: translateY(-60px);
transform: translateY(-60px);
}
.example-2 .wrapper {
background: url(https://tvseriescritic.files.wordpress.com/2016/10/stranger-things-bicycle-lights-children.jpg) center/cover no-repeat;
}
.example-2 .wrapper:hover .menu-content span {
-webkit-transform: translate(-50%, -10px);
transform: translate(-50%, -10px);
opacity: 1;
}
.example-2 .header {
color: #fff;
padding: 1em;
}
.example-2 .header::before, .example-2 .header::after {
content: '';
display: table;
}
.example-2 .header::after {
clear: both;
}
.example-2 .header .date {
float: left;
font-size: 12px;
}
.example-2 .menu-content {
float: right;
}
.example-2 .menu-content li {
margin: 0 5px;
position: relative;
}
.example-2 .menu-content span {
transition: all 0.3s;
opacity: 0;
}
.example-2 .data {
color: #fff;
-webkit-transform: translateY(calc(70px + 4em));
transform: translateY(calc(70px + 4em));
}
.example-2 .title a {
color: #fff;
}
.example-2 .button {
display: block;
width: 100px;
margin: 2em auto 1em;
text-align: center;
font-size: 12px;
color: #fff;
line-height: 1;
position: relative;
font-weight: 700;
}
.example-2 .button::after {
content: '\2192';
opacity: 0;
position: absolute;
right: 0;
top: 50%;
-webkit-transform: translate(0, -50%);
transform: translate(0, -50%);
transition: all 0.3s;
}
.example-2 .button:hover::after {
-webkit-transform: translate(5px, -50%);
transform: translate(5px, -50%);
opacity: 1;
}
</style>
</html>
copy this code to your index.html file and define some functions to change the author, title and text written over it
// define function to get the data from storage if file already savedwindow.onload = function(){ front.send('get-data', app.getPath('userData')); }
front.on('get-data-result', function(msg){ if(msg != "@@"){ let data = msg.split('@'); document.getElementById('author').innerHTML = data[0]; document.getElementById('title').innerHTML = data[1]; document.getElementById('text').innerHTML = data[2]; } })
// here define some functions to save the data into storage and get back them
function save(){ let author = document.getElementById('author').innerHTML; let title = document.getElementById('title').innerHTML; let text = document.getElementById('text').innerHTML; let msg = author + "@" + title + "@" + text; // let make a complete string of message seperated by @ // send this msg and path where to save file to back process to save in external storage of android front.send('save-data',app.getPath('userData'), msg) }
add these functions to the index.htmlfile for retrieving the saved data when app opens and save the new data if user save it.
so we make a function called savewhich triggers when user click on save and get the author, title and text and send it to back process to save the data and path where to save that data into the storage of android device.
and when app opens, it request for data over signal get-data and when it get’s the data over signal get-data-resultfrom back process, it fill’s the data into the HTML view.
So let’s define functions to handle the data in main.js (back process):
const back = require('androidjs').back;
const fs = require('fs');
const path = require('path');
// defin signal save-data to listen from front process
back.on('save-data', function(filepath, msg){
fs.writeFile(path.join(filepath, 'data.txt'), msg, function(err){
if(err) throw err;
console.log('file saved')
})
})
back.on('get-data', function(filepath){
fs.readFile(path.join(filepath, 'data.txt'), 'utf-8', function(err, data){
if(err) back.send('get-data-result', '@@');
else back.send('get-data-result', data);
})
})
copy these functions to your main.js file to handle the data coming from frontprocess (index.html)
Since Android JS provides Node JS runtime environment, that’s why we are writing our back end codes in Node JS.
So we require androidjs to get the facilities provided by androidjs ,fsmodule to save data into the storage and path module to create the path.
we defined a signal save-data which get’s the data and path from the front process and save it to the storage of android device with name data.txt
and get-data signal read the same file from the storage and send the data to the front process.
So let’s start packaging process
before starting packaging just configure your app
- app name
- package name
- icon
- android permissions
- output directory
{
"name": "myapp",
"app-name": "myapp",
"package-name" : "mypkg",
"icon": "./assets/icon/icon.png",
"permission": ["android.permission.INTERNET", "android.permission.WRITE_EXTERNAL_STORAGE", "android.permission.READ_EXTERNAL_STORAGE"],
"version": "1.0.0",
"dist-path": "./dist",
"description": "",
"main": "index.js",
"scripts": {
"test": "echo "Error: no test specified" && exit 1"
},
"author": "",
"license": "ISC",
"dependencies": {
"androidjs": "^1.0.5"
}
}
your package json look like this after all the configurations
here we defined 3 permissions
android.permission.INTERNETfor internet accessandroid.permission.WRITE_EXTERNAL_STORAGEfor write permissionandroid.permission.READ_EXTERNAL_STORAGEfor read permission
So we done with configuration part
let’s start packaging app
In order to package your app you just need to open console into our app’s directory
NOTE: Make sure you already installed androidjs-builder and JDK ≥ 1.8
cd ~/desktop
cd myapp
androidjs b -f
then after a while you’ll find a signed apk inside the dist folder
Link of source code which we use in this tutorial
Download: https://github.com/android-js/sample-app/tree/master/story-app
Link of website
Website : https://android-js.github.io/
Link of documentation
Docs: https://android-js.github.io/androidjs
Link of project
Repository : https://github.com/android-js/androidjs/
Cheers !
